How to deploy a website?
Today we are going to talk about website/frontend deployment, starting from the simplest one to the fully automatic solution.

Today we are going to talk about the ways of deploying websites. There are a lot of methods, approaches and practice on the Internet to deal with this task. But what the difference between them? What pros and cons each has? What is the best suitable for your case? I'm going to answer these questions based on my personal experience and give you a base knowledge on this topic. I think this will be a good start to get to know DevOps practices as well.
Content
- Motivation
- Pre-requirements: domain, remote server/VPS, ssh/ftp access
- Simple way: scp, rsync, FTP
- Adding version control and deploy using git
- Automatization: GitLab CI/CD;
- Summary
Motivation
Quite often my friends/colleagues/familiars write me something like that:
— Hi bro, I've made a small website/simple web app for myself/my friend/coffee shop/{{ reason-to-launch-website }}. Everything works fine, but how to deploy it? Can you help me?
— I see, but you can google how to make this. There are a lot of tutorials on the Internet.
And in a few hours/days/weeks:
— Listen, I've found a tutorial and made the same steps, but something went wrong/doesn't work/I'm stuck. Could you help, please?
— Ok, let's see...
The time is a valuable resource and to stop spending it on this topic again and again, I decided to write this post about website deployment. This is not a simple step-by-step tutorial, it's short guide about the methods of delivering and deployment websites to a remote server. This guide is also useful for simple web-apps or SPA (Single Page Applications). The only remark: you may need to update Nginx configuration to make it run correct.
So, when next time someone asks me to help with deploy - I'll just share the link to this post.
I know that this guide isn't perfect and if you still can't organize deployment or have questions/suggestions/recommendations - feel free to write a comment. This might help improve this guide and make it as useful as possible.
Btw, this post is the first post in AmiFactory Team blog. Our motivation to start the company blog is going from one of our company principles: Creating and launching products, together with sharing knowledge with the developer's community. This blog is our contribution to increasing the level of competence and awareness of web developers.
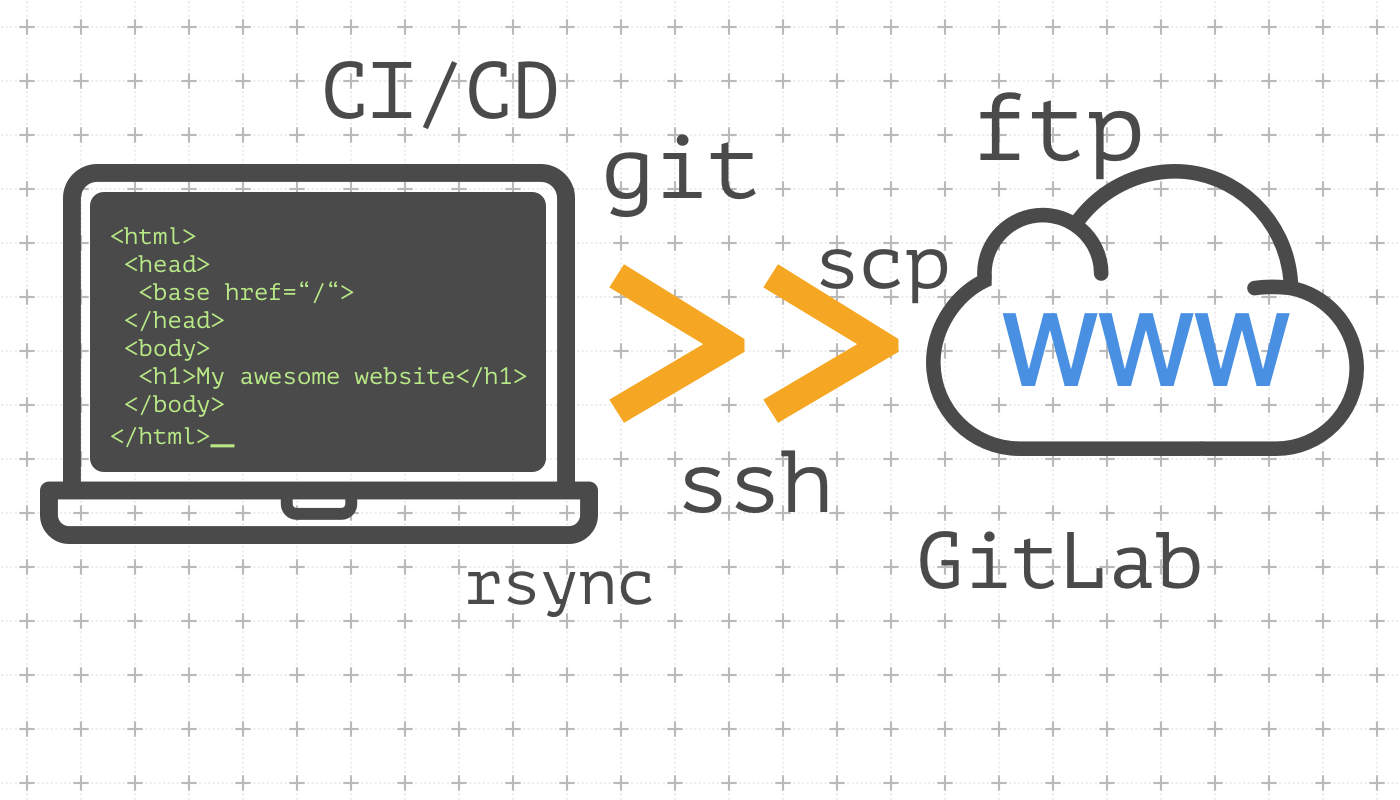
I suggest highlighting the available methods of website deployment, starting from the simplest one to the fully automatic solution, similar to what we use at AmiFactory.
Pre-requirements
For success website/frontend deploy you need a few key components:
- Your own domain name;
- VPS or any other Linux host, that is accessible from the Internet and you have access to it;
- The website/frontend project itself, that you have run and tested locally on your laptop.
This guide doesn’t contain steps to get a domain name or VPS but let’s say a few words about each.
Domain name
There are a lot of domain registrants today. Here is a TOP of domain registrants from TechRadar. I personally prefer Namecheap and Amazon Route53. The first provides good pricing and the second one provides good API for DNS records management.
Hosting
For this guide, we will use VPS (Virtual Private Server). It's a good compromise between shared hosting and dedicated server. You get more control over the host, more stable computation resources and don't pay a lot as with dedicated server. Here is a TOP of VPS providers from TechRadar. I personally recommend DigitalOcean and here is why:
- Simple and understandable admin panel and good documentation;
- Good pricing combined with good VPS configurations;
- Several data centers to place you VPS closer to your target audience;
- Powerful API for automatization and useful integrations.
If you still don’t have hosting, consider using our referral link to Sign-up DigitalOcean account. You will get $100 credit over 60 days, which is enough to try all described methods. Please notice that this is an option, so feel free to choose any VPS provider you like - this guide does not depend on DO VPS.
Independent to selected hosting provider you will need VPS with at least 1vCPU, 1GB RAM, 20GB storage, Ubuntu 18.04, public IP and access via ssh. Initial setup for DO image of Ubuntu 18.04 you can find here or you can use Ansible Playbook from demo project repository, but let’s talk about this later. Also, please notice that your domain should point to your VPS IP address, so DNS A record should exist. Also, here is a good guide on SSH essentilas and setup.
Website
For this guide, we will use a prepared demo website project. Yes, it hosts on GitLab. We will discuss why we choose GitLab over Github or BitBucket. This is a simple static website with additional pre-processing to bring it closer to a real project. 'misc' directory contains bash script sync-with-ftp.sh for FTP sync and post-receive git-hook, that you will need during 'deploy using git' method. 'src' directory contains the sources of the demo website.
Additionals
A few words about git repository for this guide. It contains several directories. 'infra' directory contains Ansible playbooks for initial Ubuntu 18.04 setup, Nginx web server, acquiring TLS certificates from Let'sEncrypt using http-challenge to enable TLS support (HTTPS) for the website. Ansible should be installed locally and ssh access to the remote host required. If you don’t have Ansible installed, you can use the official Ansible Docker image to run it docker container. Or you can use our Ansible Docker image, based on Ubuntu 16.04 with Ansible installed. In both cased Docker install required.
You don't have to be Docker or Ansible guru - only basic knowledge and minimal experience required to proceed steps, where these technologies involved.
Anyway, running Ansible playbook locally, you can do the initial setup of Ubuntu 18.04:
$ cd infra
$ ansible-playbook -i inventory/webserver -e 'ansible_ssh_user=root' -v playbook-initial.yml
Then you can run Nginx, Certbot (Let'sEncrypt) and other stuff installation:
$ ansible-playbook -i inventory/webserver -v playbook.yml
As result, you should have fully prepared web server, ready to website or frontend hosting. One short notice: we've tested these Ansible playbooks with Digital Ocean Ubunty 18.04 droplet, so if you face unexpected issues - let me know in comments.
Simple way: scp, rsync, FTP
Let’s talk a little bit about the essentials of any website deployment process. In basics, if we omit all pre-processing, linters, minification and others, it's just moving files from developers laptop to the web server host. From this perspective, the simplest way to deploy a website is a direct local files copy to a remote host.
SCP
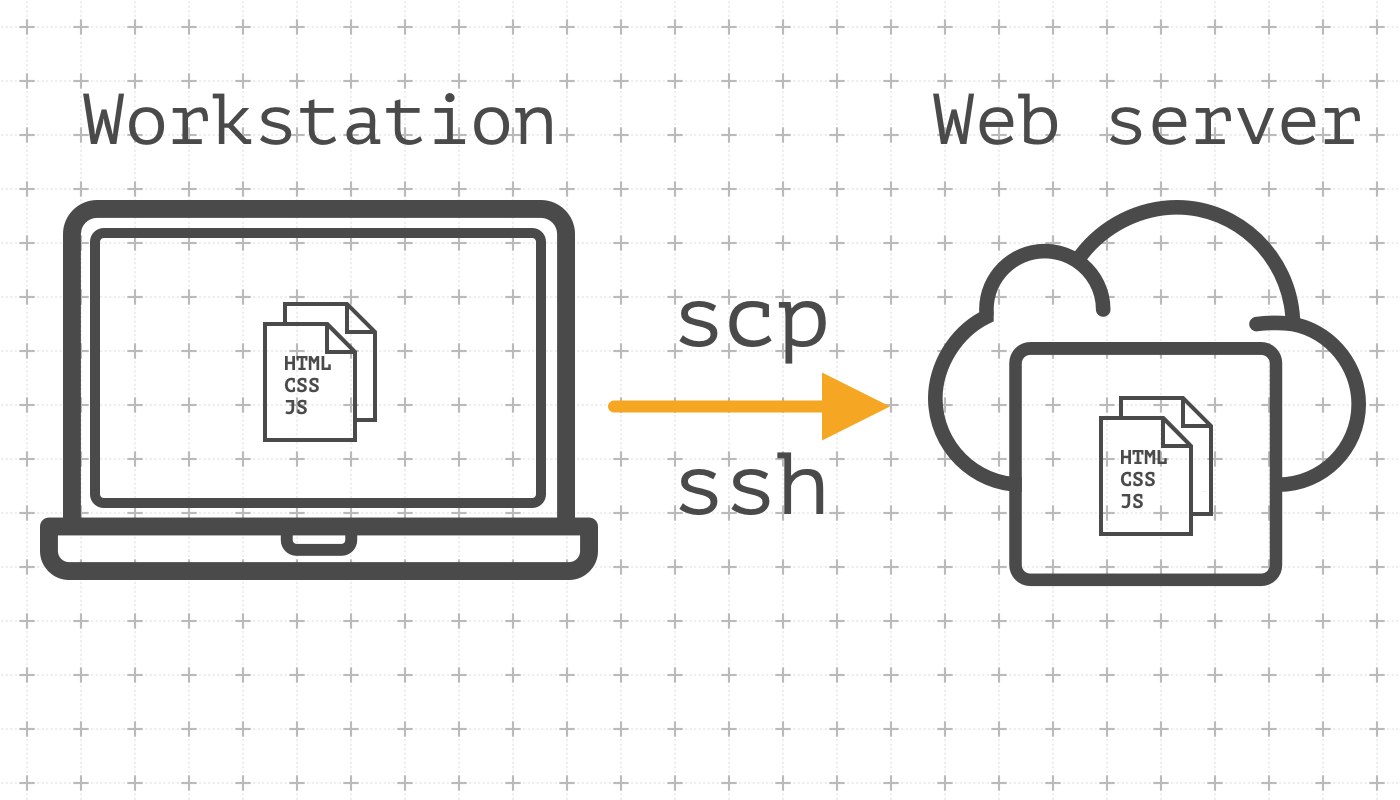
Utility scp (stands for 'secure copy') allow copying files from a local host to a remote host using ssh protocol. According to this, you should have working ssh connection to a remote host. scp allows copying a single file or whole directory:
$ scp -C dist/index.html ubuntu@webserver:/opt/webserver/www/example.com/
index.html                                   100%  670    22.1KB/s   00:00

$ scp -rC dist/* ubuntu@webserver:/opt/webserver/www/example.com/
404.html                                     100%  660    21.3KB/s   00:00
main.min.css                                 100%  770    25.6KB/s   00:00
main.css                                     100% 1337    44.5KB/s   00:00
keyboard.jpg                                 100%  240KB   1.3MB/s   00:00
index.html                                   100%  670    21.7KB/s   00:00
main.min.js                                  100%  125     4.2KB/s   00:00
main.js                                      100%  168     5.5KB/s   00:00
where:
-r - recursive copying;
-C - use compression.
More details about scp params and using you can get on man scp
Pros:
- Simple using;
- Support compression;
- Secure because of data is transmitting to a remote host using ssh protocol.
Cons:
scpuses a plain linear copy. This means that even if the file didn't change locally, it will be transmitted over the network to a remote host anyway;scpworks slowly in case you need to copy a large number of files;scpdoesn't have a lot of copy options.
scp was developed to copy files and like any good Linux utility, it deals greatly with its single task. In our case during website development, only the part of files change frequently. That's why we can clarify previous definition: initial website's files copy with future synchronization of changes.
RSYNC
rsync utility offers described functionality. The main difference between scp and rsync is the implementation of a special delta transfer algorithm and a few optimizations to make the operation faster.
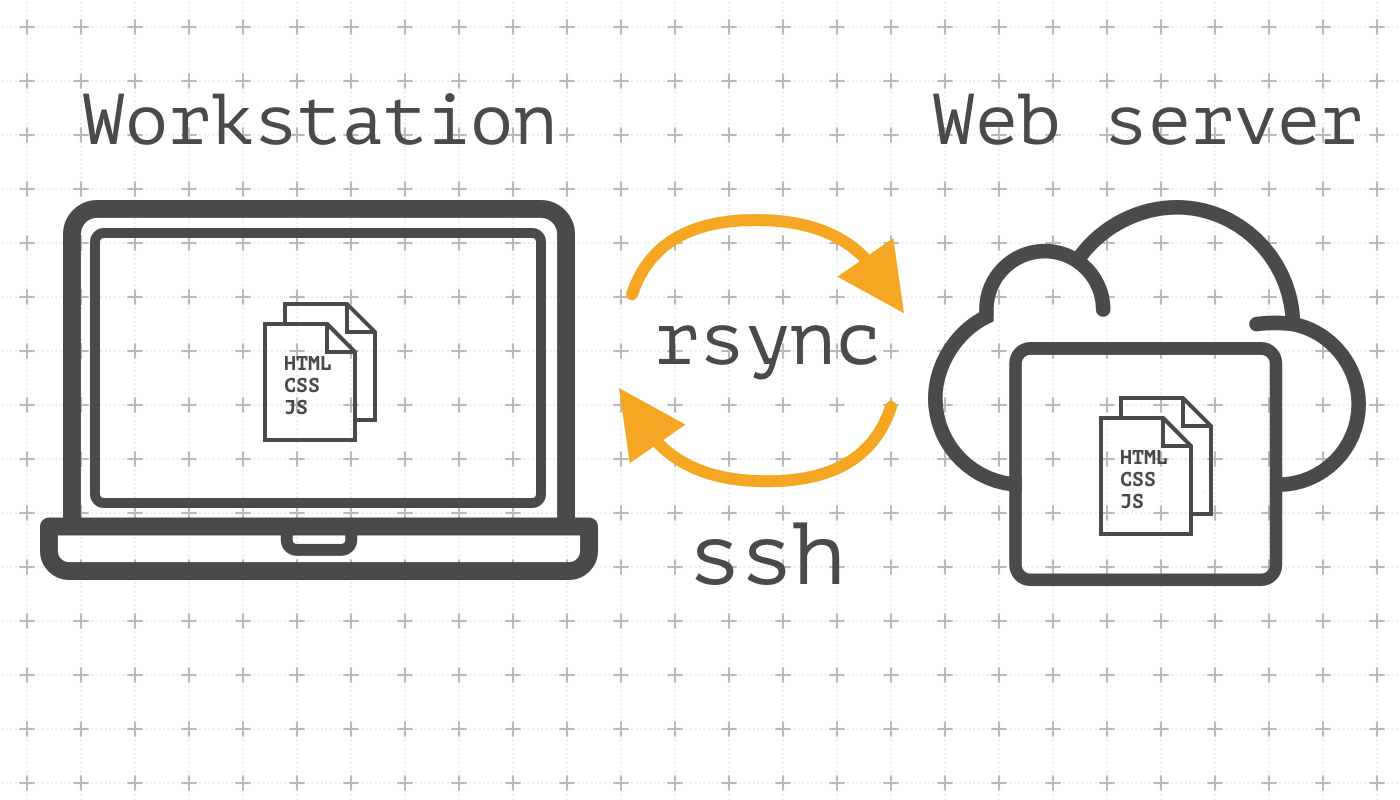
During the first deploy, rsync works in the same way as scp, but during the next deploy, it will copy changed files only. This greatly reduces deploy time:
$ rsync -rvzhe ssh src/* ubuntu@webserver:/opt/webserver/www/web.afstaging.network/
building file list ... done
404.html
index.html
css/
css/main.css
css/main.min.css
img/
img/keyboard.jpg
js/
js/main.js
js/main.min.js

sent 246.90K bytes  received 192 bytes  98.84K bytes/sec
total size is 249.01K  speedup is 1.01
-r - recurse into directories;
-v - increase verbosity;
-z - compress file data during the transfer;
-h - output numbers in a human-readable format;
-e ssh - specify the remote shell to use, ssh in this case.
You can get more details rsync and it's options on man rsync
Pros:
- Synchronization instead of full linear copy;
- Several synchronization options: selecting files comparison method, removing remote files that were removed locally, etc;
- Secure because of data might be transmitted to a remote host using ssh protocol.
Cons:
- A little more complex because of a large number of params to run.
FTP
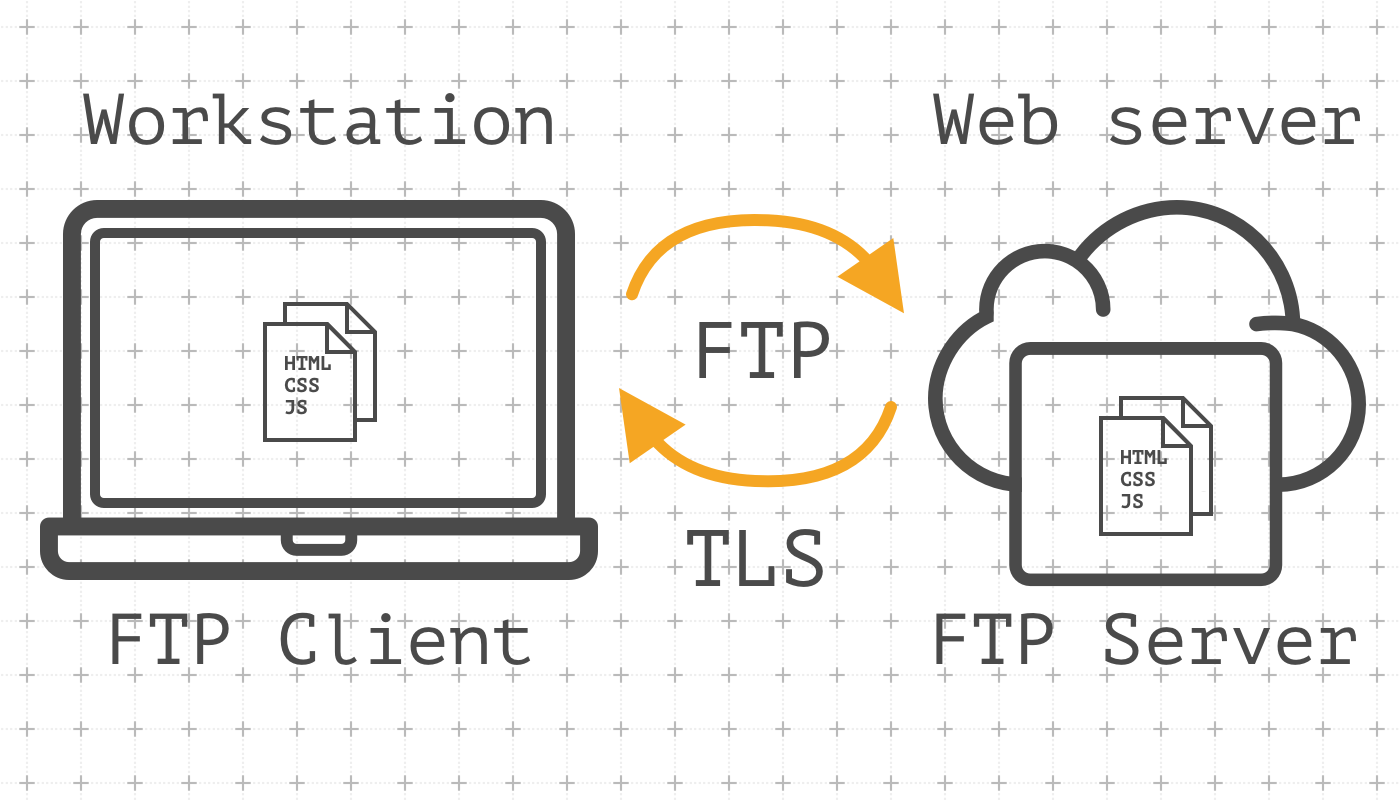
Both described methods are effective and might be used during the website development process. But they both suppose you have ssh access to a remote host, which is not always possible, especially if you choose shared hosting without ssh access or your workstation works under Windows. Yes, I know and even used tools like PowerShell, Cygwin, MinGW, PuTTY and other stuff. But in most cases using FTP rid you of setting up a local environment and ssh access to a remote host. Besides, there are many good, multiplatform and mature ftp clients with GUI. The most popular is FileZilla. Similar to scp, FTP allows copying of a single file or a whole directory. As with rsync, you can sync files by date or/and file size. I won't describe work with FileZilla, because of:
- It's a fairly wide topic;
- FileZilla GUI is quite intuitive even for beginners.
Instead of this, I will show how to sync files via FTP using CLI utility lftp. Let's create a simple Bash script named ftp-sync.sh, which we will call each time we need to deploy local changes:
#!/bin/bash

# This is a simple bash script, which call lftp utility to sync
# your local website directory (LCD) with remote host website directory(RCD)

# FTP username (replace with your ftp-user login)
USER=ftp-user
# FTP user password (replace with your ftp-user password)
PASS=my-secret-password
# Website address (replace with your website domain)
HOST="example.com"
# Website local source directory (dist) (replace with your project path)
LCD="/<path to your project on your laptop>/dist"
# FTP target directory (related to FTP root) (usually the same as domain name, exampe.com)
RCD="example.com"

lftp -f "
open $HOST
user $USER $PASS
lcd $LCD
mirror --continue --reverse --delete --verbose $LCD $RCD
bye
"
Add executable rights for the user and run it:
$ chmod u+x ftp-sync.sh
$ ./ftp-sync.sh
source: Is a directory
Transferring file '404.html'
Transferring file 'index.html'
Making directory 'css'
Transferring file 'css/main.css'
Transferring file 'css/main.min.css'
Making directory 'img'
Transferring file 'img/keyboard.jpg'

Making directory 'js'
Transferring file 'js/main.js'
Transferring file 'js/main.min.js'
But you should keep in mind than FTP is a more complex protocol/tooling comparing to ssh/scp/rsync. FTP establishes a separate TCP connection for command stream and separate TCP connection for directory listing and files transfer. Also, there are two work modes of FTP server. They affect the way transfer connections establishes:
- Active mode;
- Passive mode.
In Active mode, FTP client starts listening TCP connections on selected port and send this port number to FTP server. FTP server establishes TCP transfer connection with the client on a received port. Work in Active mode is impossible if a client is behind Firewall, NAT or for any other reason can't receive TCP connections on the selected port.
To solve this problem, FTP server might work in Passive mode. The client asks the server to work in Passive mode. If the server provides this feature, the client receives IP address and the port number on which the server waits for TCP transfer connections. In Passive mode, FTP server has dedicated port range and selects free port for each new client. This port range should be opened on remote host firewall.
Also, FTP might use TLS encryption to avoid clear text files transmission.
Pros:
- Extremely simple and widely used method to deploy a static website;
- Might be used even if ssh access to a remote host is not provided;
- Many multiplatform FTP clients with GUI or CLI;
- Secure in case of using explicit FTPS (FTP + TLS).
Cons:
- It's quite often lack of TLS support on FTP server side;
- It's a little hard to set up the FTP server in a case when hosting provider doesn't provide FTP access;
- Additional software (FTP server) installed on a remote host;
- Passive FTP mode requires a range of opened ports on a remote host Firewall.
Version control and deploy using git
Today it's hard to image the working process on any software project without using Version Control System (VCS). If you still don't use Git - you definitely should start, even if you don't plan to use GitHub/GitLab.
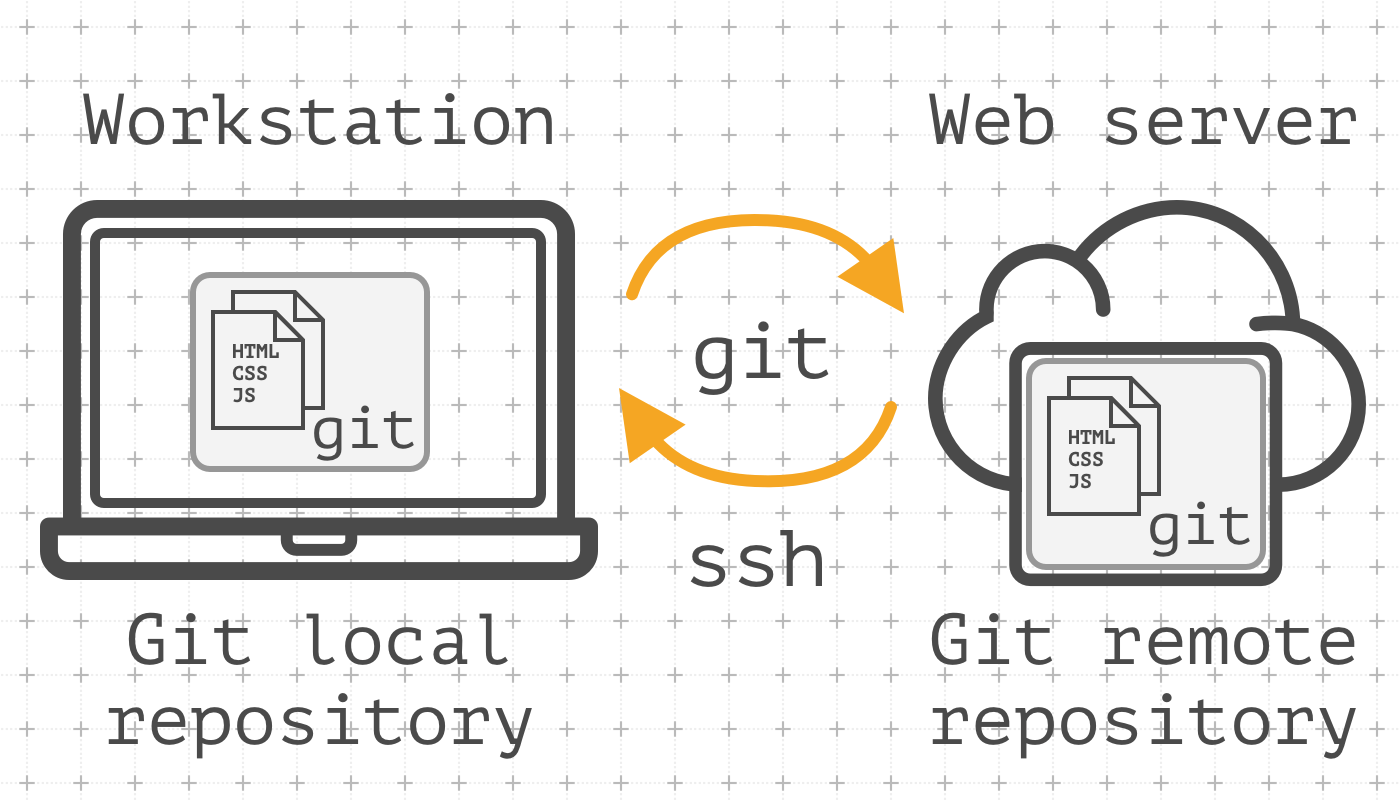
In addition to the main purpose, it's convenient to use git as a tool for deploying. This method is based on using git-hooks. The basic idea is to have a bare git repository on the remote host (your web server). You push your local changes to this remote repository. After every success push, the remote git repository will run post-receive hook, which is a plain Bash script. This script will run the deployment process
Pre-requirements:
gitshould be installed locally on the workstation and on the remote host;- You should have working ssh access to the remote host.
First, let's set up the remote host. Log in to the remote host and create a bare git repository:
$ ssh user@remote-host
$ sudo mkdir /opt/webserver/www/example.com
$ sudo chown ubuntu:ubuntu /opt/webserver/www/example.com
$ git init --bare ~/myawesomewebsite.git
Initialized empty Git repository in /home/ubuntu/myawesomewebsite.git

$ cd ~/myawesomewebsite.git
Add git post-receive hook:
$ touch hooks/post-receive
$ nano hooks/post-receive
#!/bin/bash

# This is a simple Git post-receive hook script, which:
# 1. Runs when new revisions (commits) arrives
# 2. Checkouts working copy to TMP directory
# 3. Backups current website root directory by renaming it adding '_bck' ending
# 4. Moving a new working copy from TMP directory to website root directory TARGET
# 5. Removes backup at the end

# Directory, where website content will be unzipped (temporary)
TMP="/tmp/example.com/"

# Root Directory, where website content located
TARGET="/opt/webserver/www/example.com"

# Root Directory of your bare Git repository
GIT_DIR="/home/ubuntu/my-awesome-site.git"
BRANCH="master"

while read oldrev newrev ref
do
	# only checking out the master (or whatever branch you would like to deploy)
	if [ "$ref" = "refs/heads/$BRANCH" ];
	then
		echo "Ref $ref received. Deploying ${BRANCH} branch to production..."
		rm -rf $TMP
		mkdir -p $TMP
		git --work-tree=$TMP --git-dir=$GIT_DIR checkout -f $BRANCH
		mv $TARGET "${TARGET}_bck"
		mv "${TMP}/src" $TARGET
		rm -rf "${TARGET}_bck"
		echo "Ref $ref received. Deploy finished."
	else
		echo "Ref $ref received. Doing nothing: only the ${BRANCH} branch may be deployed on this server."
	fi
done
$ chmod +x ~/myawesomewebsite.git/hooks/post-receive
Now the remote host is ready. Let's move to the workstation set up. Your project/website should be under git control. If not, you should:
Initialize git repository in your project root directory:
$ cd your-project-dir
$ git init .
Initialized empty Git repository in /home/username/your-project-dir/.git
Add project files to git stage. Don't forget about .gitignore:
$ git add .
$ git -m "Initial commit"
[master (root-commit) dd974a7] Initial commit
 33 files changed, 10582 insertions(+)
 create mode 100644 .dockerignore
 create mode 100644 .gitattributes
 create mode 100644 .gitignore
 create mode 100644 .gitlab-ci.yml
 create mode 100644 LICENSE
 create mode 100644 Readme.md
 create mode 100755 gulpfile.js
 create mode 100644 infra/environments/default.yml
 create mode 100644 infra/environments/webserver.yml
 create mode 100644 infra/files/91-custom
 create mode 100644 infra/files/default.nginx.conf
 create mode 100644 infra/files/ftponly
 create mode 100644 infra/files/nginx-restart.sh
 create mode 100644 infra/files/ssl-params.conf
 create mode 100644 infra/inventory/webserver
 create mode 100644 infra/playbook-initial.yml
 create mode 100644 infra/playbook.yml
 create mode 100644 infra/roles/vsftpd/tasks/main.yml
 create mode 100644 infra/templates/nginx.conf.j2
 create mode 100644 infra/templates/ssl.conf.j2
 create mode 100644 infra/templates/vsftpd.conf.j2
 create mode 100644 misc/deploy/deploy.sh
 create mode 100755 misc/ftp/sync-with-ftp.sh
 create mode 100755 misc/git/post-receive
 create mode 100644 package-lock.json
 create mode 100755 package.json
 create mode 100644 src/copy/img/keyboard.jpg
 create mode 100644 src/js/main.js
 create mode 100644 src/sass/main.scss
 create mode 100644 src/templates/404.twig
 create mode 100644 src/templates/components/head-content.twig
 create mode 100644 src/templates/index.twig
 create mode 100644 src/templates/layouts/default.twig
Add a new remote git repository:
$ git remote add webserver ubuntu@webserver:myawesomewebsite.git
Now we are ready to push our working copy to the remote host. During the push, you will see post-receive hook output in the console:
$ git push webserver master
Enumerating objects: 55, done.
Counting objects: 100% (55/55), done.
Delta compression using up to 8 threads.
Compressing objects: 100% (38/38), done.
Writing objects: 100% (55/55), 318.12 KiB | 11.78 MiB/s, done.
Total 55 (delta 0), reused 0 (delta 0)
remote: Ref refs/heads/master received. Deploying master branch to production...
remote: Already on 'master'
remote: Ref refs/heads/master received. Deploy finished.
To webserver:myawesomewebsite.git
   07e0709..b7df4f4  master -> master
Pros:
- A simple and understandable deploy process -
git push; - Easy to integrate/call from your favorite IDE/TextEditor, that has minimal
gitintegration; - Because of git-hook is a plain Bash script, you can do any customization of your deploy process: copy files to the required directory, do a backup, restart a web server, etc.;
- Ability to quickly revert deploy to previous state using git log and git revert;
- No need to use any additional tools for deploy in case you use
gitas VCS; - Effective and fast, because
git pushtransmit the only diff between your local and remote repositories; - Secure, because of data between two git repositories transmits using ssh protocol.
Cons:
- Git post-receive hook calls only ones after all git refs will be updated. So, in a case of unsuccessful deploy, you can't call hook again. The only way is to push another commit;
- You need to install and configure
gitand git-hook on the remote host; - Errors in git-hook might lead to website downtime.
Deploy using git is still widespread and applies on many small and medium projects.
git saves the history of code-base changes, but neither save the history of deployments nor deploy logs.
Also, if you use 'central' git repository on GitHub/GitLab/{{ your-option }} services, you need always remember to push both to 'central' and 'deploy' repository. If several developers work on the same project, we got an additional problem of synchronization of 'central' and 'deploy' repository.
And the last: Deploying in this way a little restricts or complicates the possible additional steps that need to be made during the deploy process. I'm talking about actions, that you do manually to prepare your project to deployment: preprocessing, minification, linters, etc. Several problems here:
- Preparation steps execute on the remote host, that hosts website. This might affect its performance;
- Preparation steps usually require installing additional tools on the host;
- In case of unsuccessful deploy, you will have to investigate the reason on the remote host.
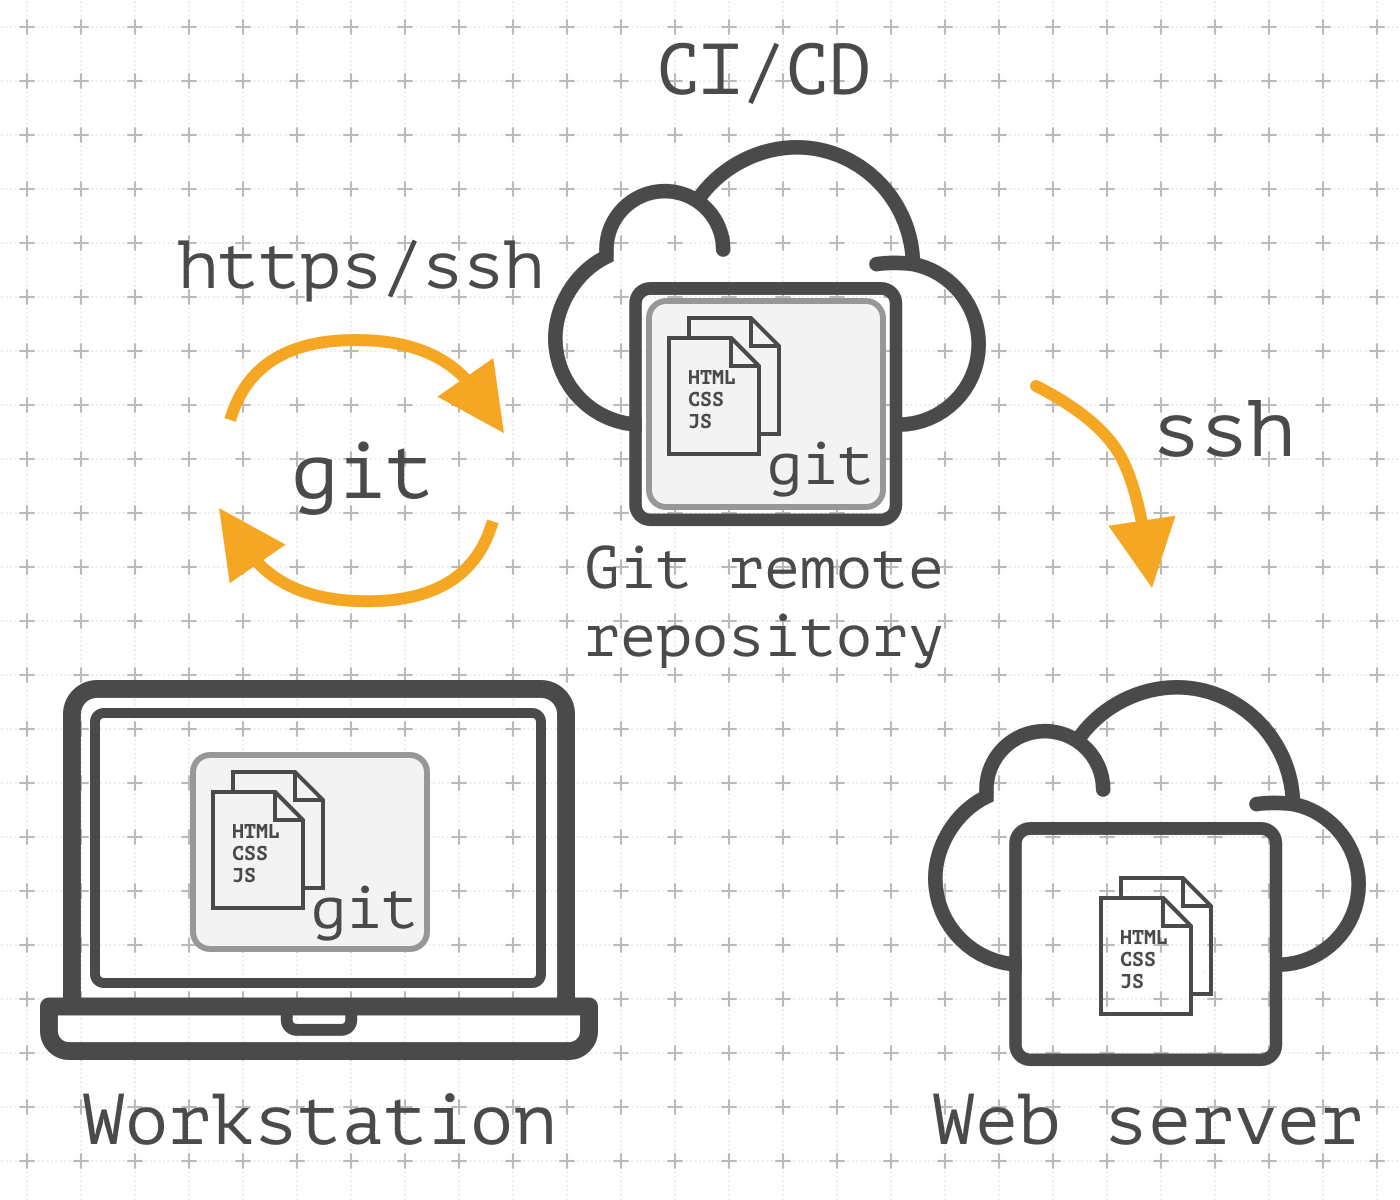
To rid of described problems we can move deployment process on a separate server. Here we come to CI/CD topic.
Automation with GitLab CI/CD
So, we’ve defined several new requirements during applying the previous method:
- Codebase synchronization;
- Need to execute additional actions during preparing to deployment;
- Deployment history and logs;
- Move deployment process execution to separate host.
All these tasks (plus some not listed here) can be done by using a good CI/CD system.
Let's dive a little in the theory. CI, Continuous integration - is the practice of merging all developers working copies to a shared mainline several times a day. (from Wikipedia). This practice is intended to solve the problem of integration hell. Working on the project alone, this problem may never occur. But working on several working stations (work and home laptop for example) - be sure, sooner or later you will encounter this problem. Having the central repository in your workflow, which is a single actual source of the codebase, allows you to avoid this problem and become the basis for the implementation of the CI practice.
The role of the central repository might play repository on GitHub/GitLab/in-house git repository. It doesn't matter where the repository is hosted, it is important that you treat it as 'central' repository. Having a 'central' repository and synchronizing your codebase with it, we solve the first task: the synchronization of the code base.
Now a few words about CD. CD might mean two things:
- Continuous delivery - is a software engineering approach in which teams produce software in short cycles, ensuring that the software can be reliably released at any time and, when releasing the software, doing so manually (from Wikipedia).
- Continuous deployment - is a software engineering approach in which software functionalities are delivered frequently through automated deployments (from Wikipedia).
So, the task of Continuous Delivery ensures the readiness of the product for deploying. In our case - the website. And Continuous Deployment provides an automatic deploy of ready-to-publish build. Under the readiness, we mean the successful execution of additional steps to get the prepared build of the website: run preprocessors, linters, minimization, obfuscation, packaging, testing, containerization, etc. Upon completion of the building, the process of deploying begins. The pipeline described above can trigger both when making changes to the central repository, and manually.
Let's get back to practice. we will use GitLab as a service for hosting the central repository and CI/CD system. Why not GitHub? There are several reasons:
- GitLab is an all-in-one service: Git repositories, CI/CD pipelines, issue tracker, Docker Registry, Simple Artifactory and many more. All these functionalities are well integrated with each other. At the time of writing this post, GitHub doesn't have similar functionality and such integrations. GitHub provides good integrations with many third-party CI/CD services, but do we really need to use any additional third-party if we can avoid it?
- GitLab has a free plan for self-hosted installations. This type of installation is important for service/outsourcing companies that work with the private customer code. In any case, we are responsible for the possible unauthorized distribution of the codebase so we prefer to avoid using any additional third-party SaaS in our processes, especially if we have to trust codebase to them. From the other side, the self-hosted solution allows us to restrict the access of any third parties and unauthorized users to the codebase and sensitive data (passwords, keys, certs, etc). In this case, the level of security and protection depends only on our team. Yes, I understand that we may make mistakes, but this will be our mistakes and our responsibility.
- BitBucket also offers a self-hosted installation, but BitBucket does not have free plans for a self-hosted installation and a little poorer functionality (it's my personal thoughts are based on my experience of mid-2018);
- As mentioned above, GitLab has built-in CI/CD pipelines. This eliminates the need to use third-party services such as CircleCI or TravisCI, regardless of whether the SaaS or Self-hosted installation is used. No, I'm not against third-party SaaS. My idea is to use the right tool/service based on the task requirements and the need to minimize the risks.
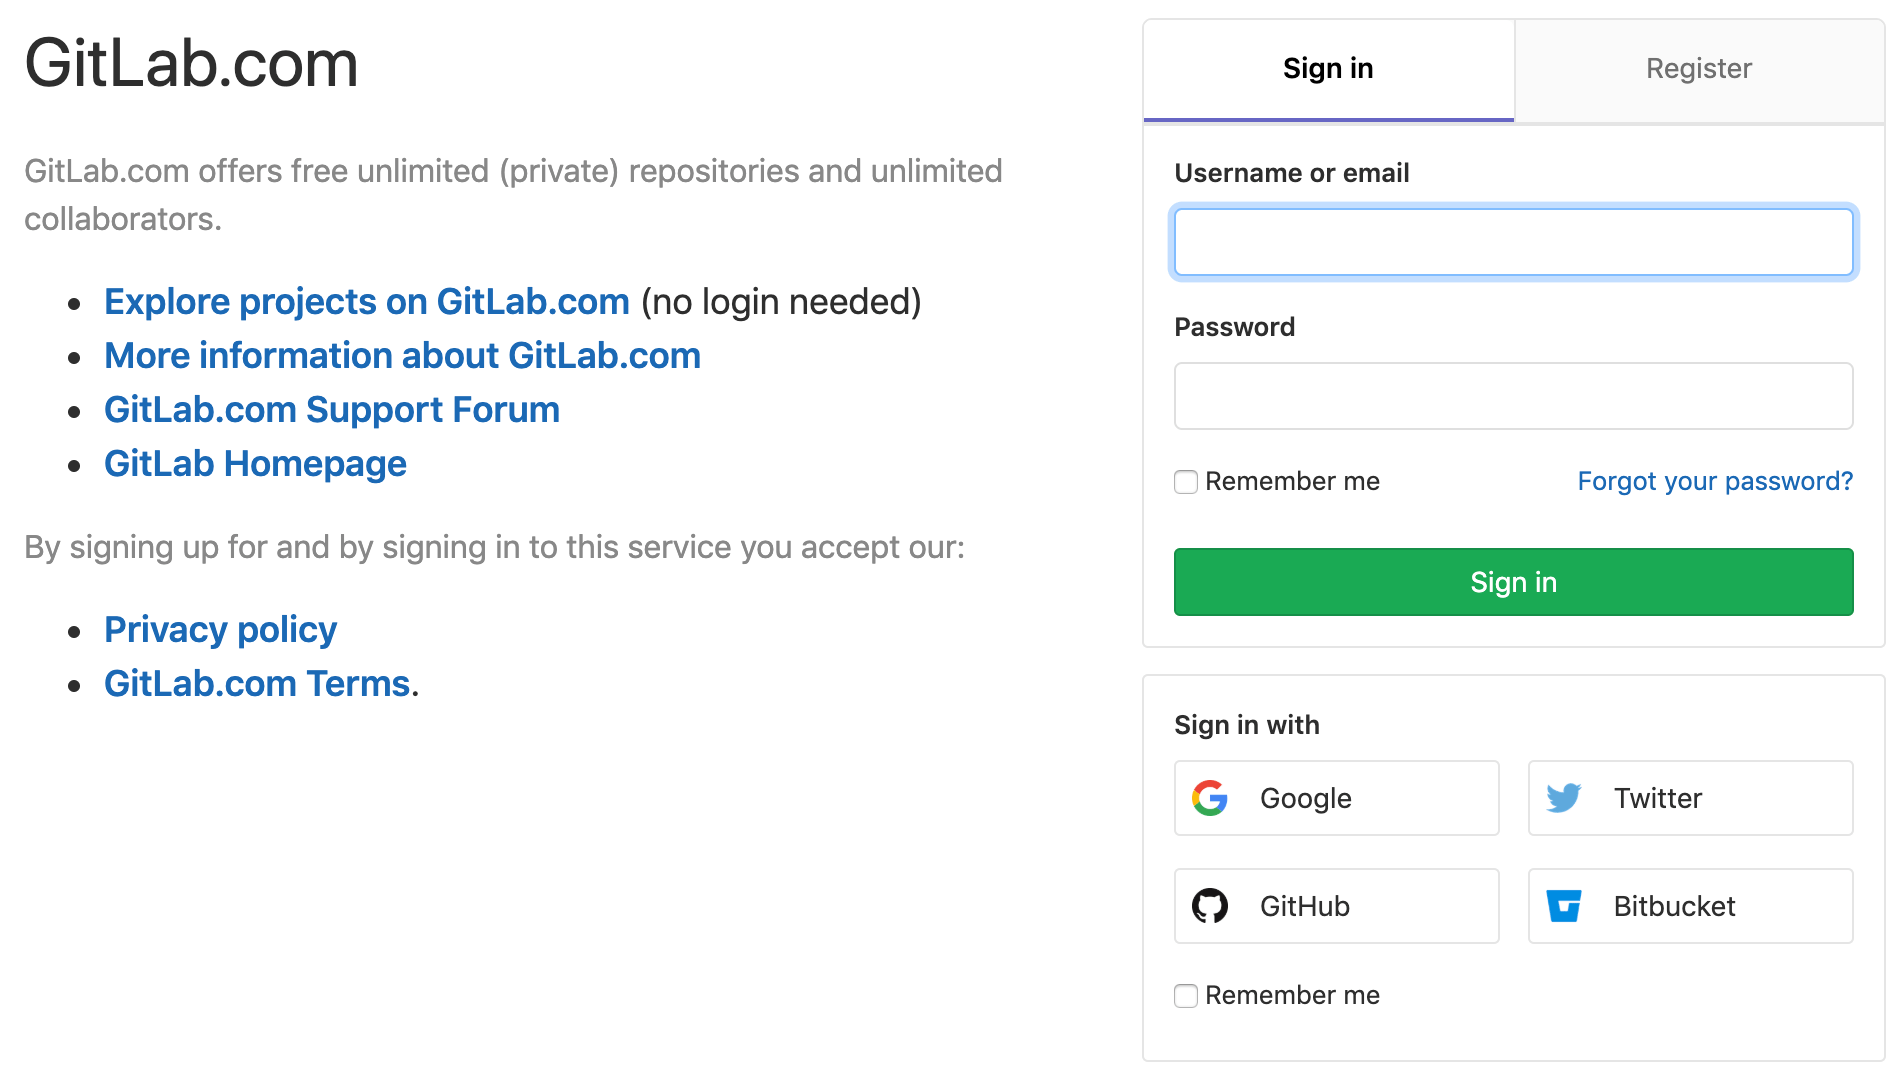
For this guide, we will use GitLab InCloud so you need to have the account on gitlab.com.
Sign-In/Sign-Up here https://gitlab.com/users/sign_in#register-pane
Once you have successfully logged in to your account, you need to create a new Project, which will contain a central repository. The project may be associated with your username, but GitLab provides the ability to create a Group for the Project. This is convenient if you need to group Projects or the Project can potentially grow into several repositories.
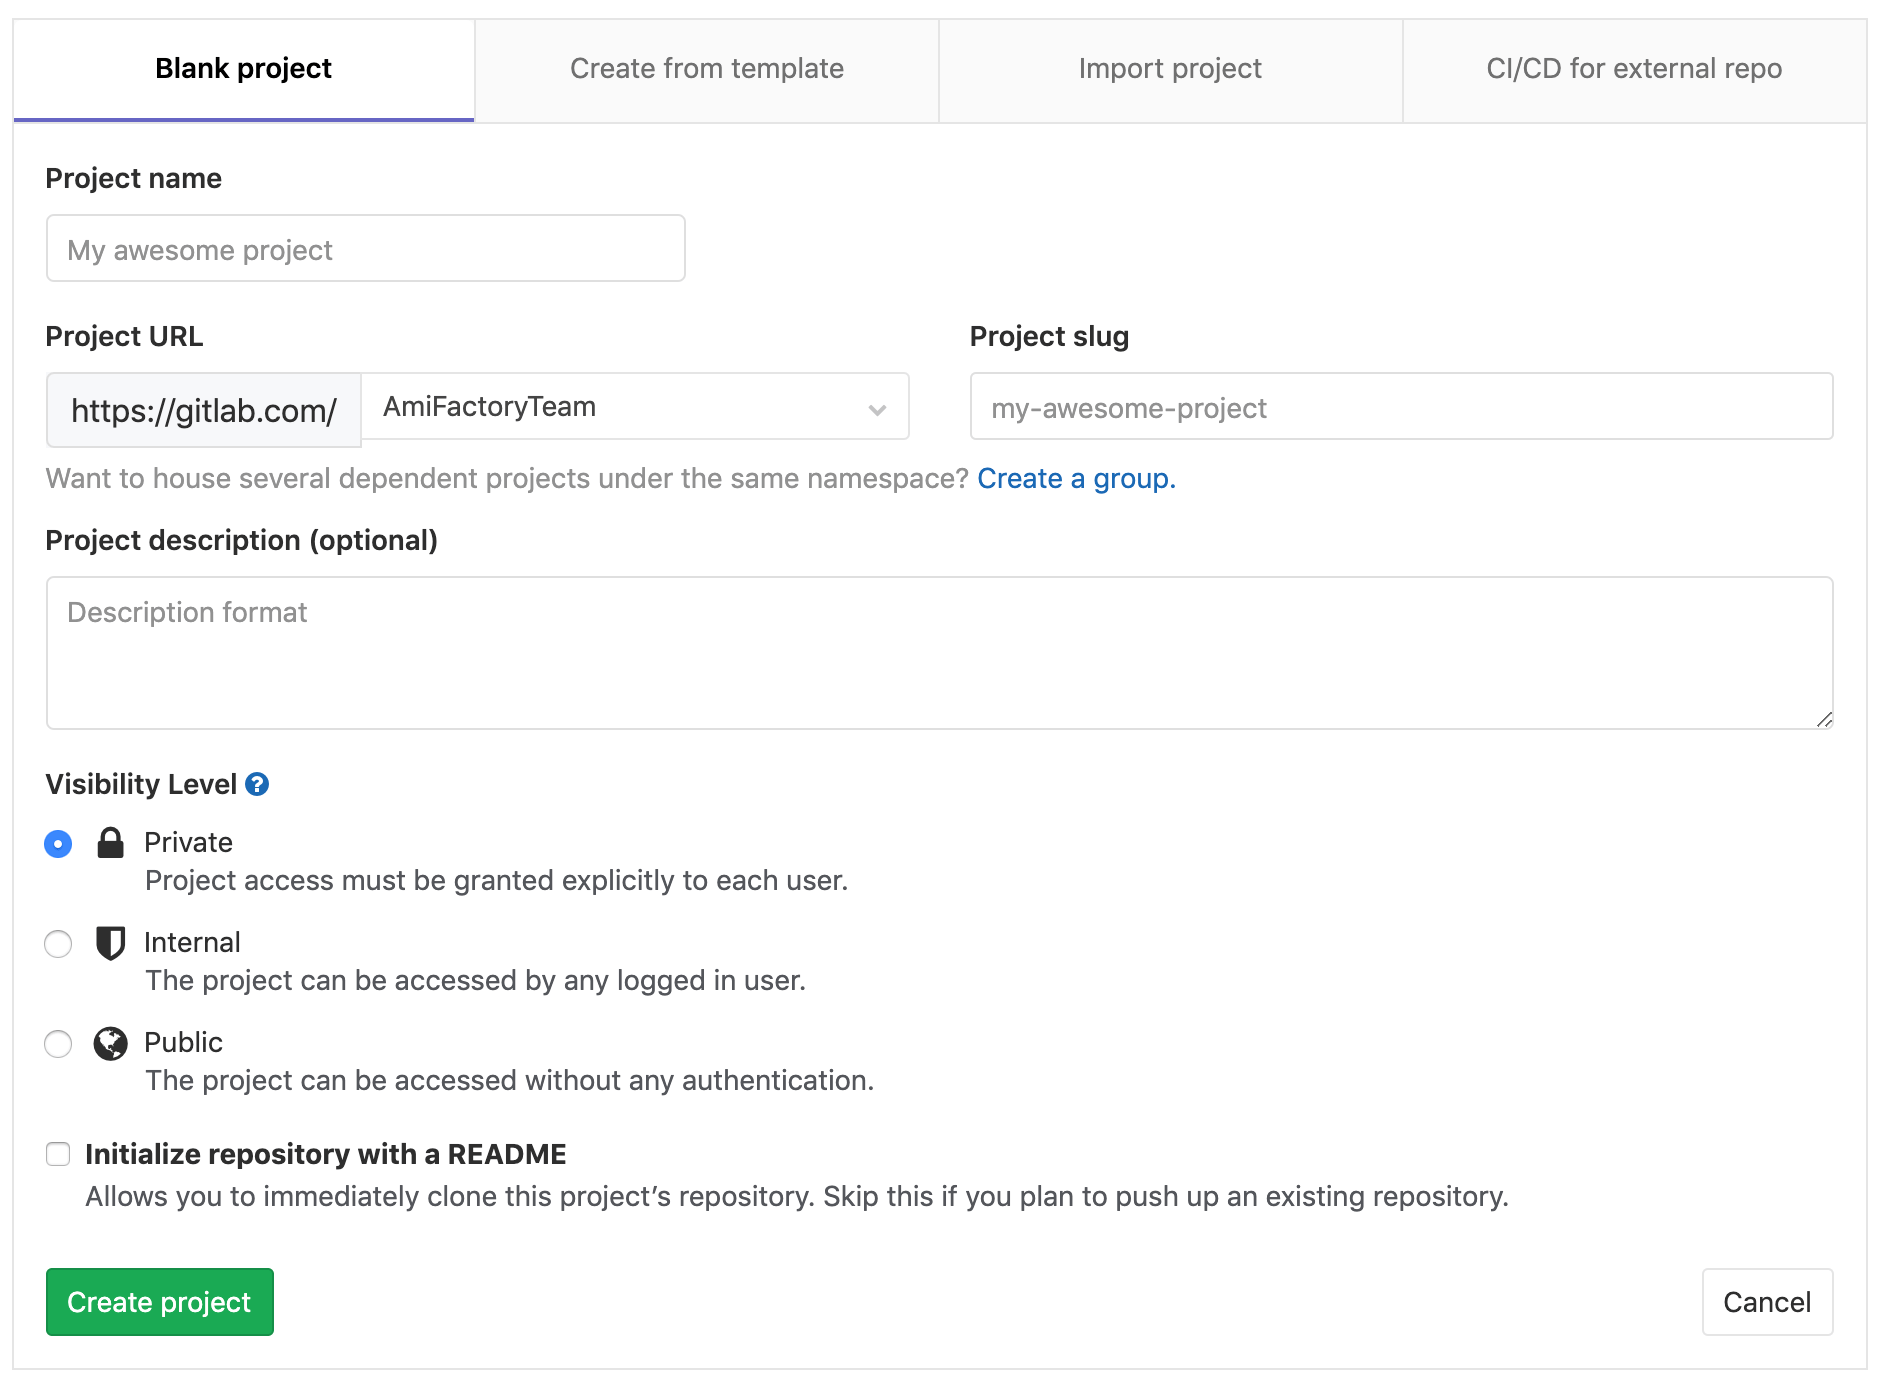
After creating the repository, we get to the landing page of the project. We are interested in two sections: "Push an existing folder" and "Push an existing Git repository".
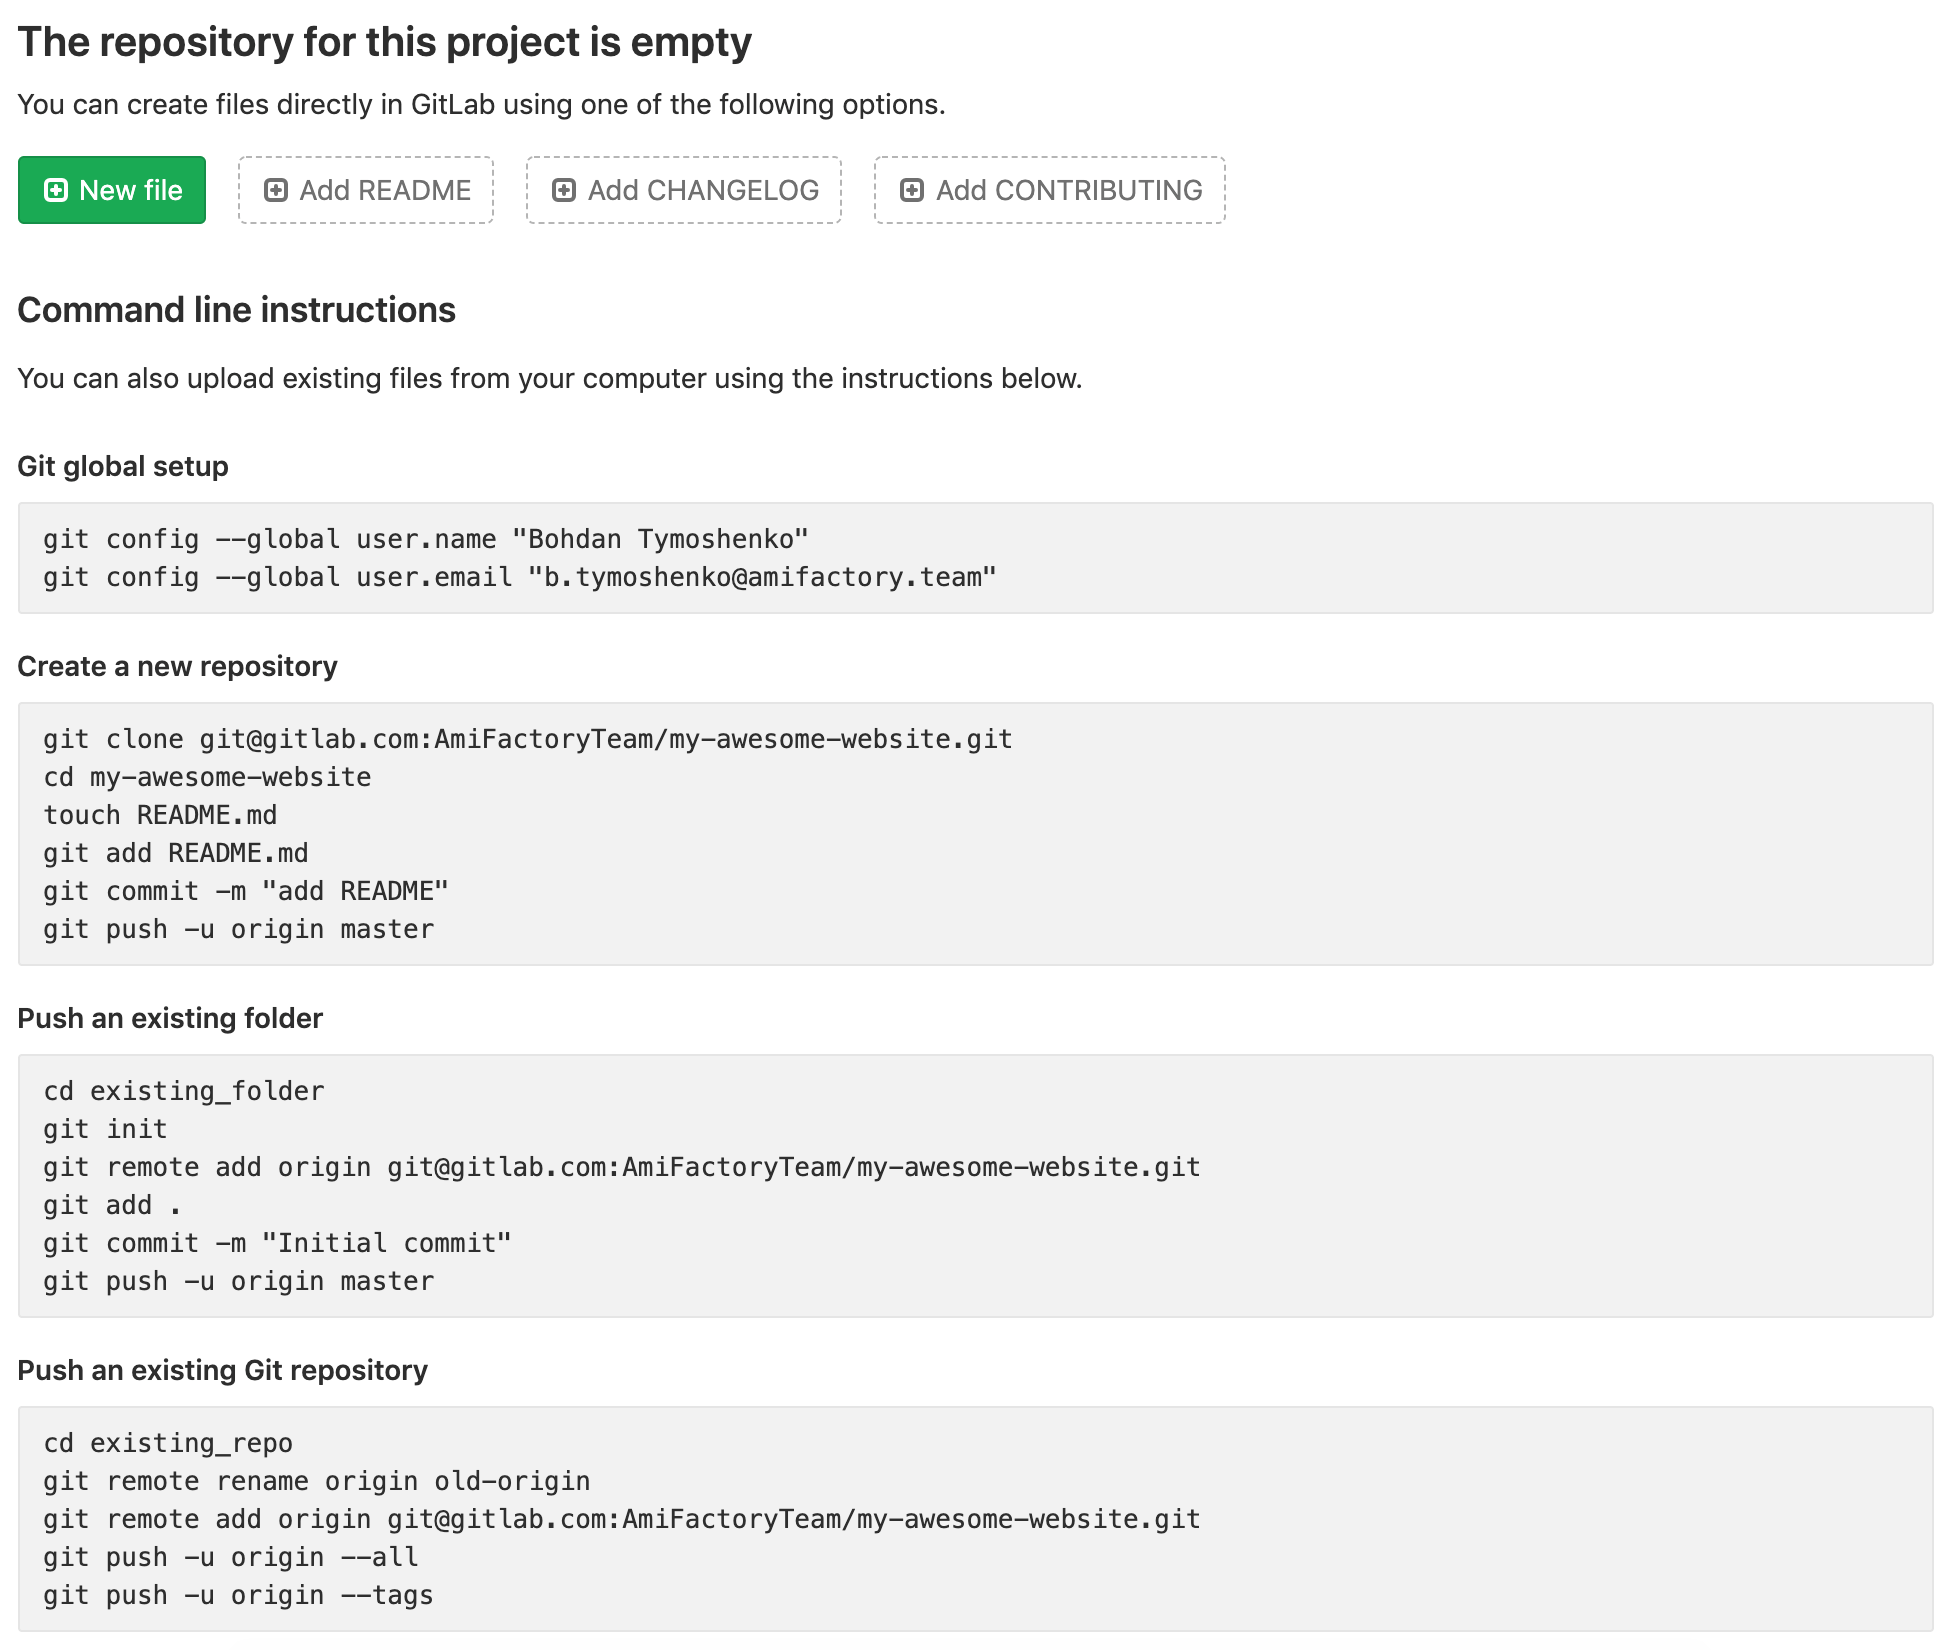
Depending on whether your project is in under version control or not, you need to execute one of the available sequences.
For a project, that didn’t use git before:
cd existing_folder
git init
git remote add origin git@gitlab.com:AmiFactoryTeam/my-awesome-website.git
git add .
git commit -m "Initial commit"
git push -u origin master
For a project under git and WITHOUT existing central repository:
cd existing_repo
git remote add origin git@gitlab.com:AmiFactoryTeam/test.git
git push -u origin --all
git push -u origin --tags
For a project under git and WITH replacing an existing central repository:
cd existing_repo
git remote rename origin old-origin
git remote add origin git@gitlab.com:AmiFactoryTeam/test.git
git push -u origin --all
git push -u origin --tags
For a project under git and WITHOUT replacing an existing central repository:
cd existing_repo
git remote add gitlab git@gitlab.com:AmiFactoryTeam/test.git
git push -u gitlab --all
git push -u gitlab --tags
So as a result, we've pushed a working copy of the project into the central repository.
Now we are going to describe our GitLab CI/CD Pipeline with two Stages: build and deploy. For each Stage we will describe Job. Job description contains configuration params and execution steps - shell commands.
Let's create .gitlab-ci.yml file on the repository root. This file will contain Pipeline configuration:
stages:
  - build
  - deploy

build_job:
  stage: build
  image: node:8.16.0-alpine
  script:
    - apk --update add zip
    - npm i
    - npm run build
    - zip -r dist.zip dist/
  artifacts:
    paths:
      - dist.zip
    expire_in: 1 month

deploy_job:
  stage: deploy
  image: alpine:3.9
  environment:
    name: production
  variables:
    MAW_HOST_VHOST_SITE_ROOT: "/opt/webserver/www/myawesomewebsite.afstaging.network"
  script:
    - apk --update add openssh-client
    - eval $(ssh-agent -s)
    - echo "$MAW_HOST_SSH_PRIVATE_KEY" | tr -d '\r' | ssh-add - > /dev/null
    - mkdir -p ~/.ssh && chmod 700 ~/.ssh
    - ssh-keyscan -t rsa -H $MAW_HOST >> ~/.ssh/known_hosts && chmod 644 ~/.ssh/known_hosts
    - scp dist.zip $MAW_HOST_USER@$MAW_HOST:/tmp/
    - ssh "$MAW_HOST_USER@$MAW_HOST" 'bash -s' < misc/deploy/deploy.sh $MAW_HOST_VHOST_SITE_ROOT
You can read the full documentation for .gitlab-ci.yml here, but I'll provide a short description of the current configuration:
-
stages- list of Pipeline Stages:buildanddeploy; -
build_job:- name and start of the first Job description. Its purpose is to prepare our project to deployment. Job configuration:stage: build- declare that this Job is abuildStage of Pipeline;image: node:8.16.0-alpine- docker image name + tag. This Job runs in a docker container, which runs from the specified image. The docker image is based on Alpine Linux image with NodeJS installed;script:- here comes a list of commands, which will be run during Job execution. Because of GitLab Runner runs on Linux, this is similar to a plain shell script:apk --update add zip- install zip tool to zip ourdestdirectory before transfer to the remote host.apkis default package manager for Alpine Linux;npm i, npm run build- install project dependencies and run build process;zip -r dist.zip dist/- zip dist directory.
artifacts:- the list of Artifacts, basically resulting products of our Job. They will be used bydeploy_job. Here we specify which files/dirs should be saved for the future use and their expiration time.
-
deploy_job:- name and start of the second Job description. Its purpose is to deploy our project. Job configuration:stage: deploy- similar to the first Job, we declare that this Job is adeployStage of Pipeline;image: alpine:3.9- docker image name + tag. This Job runs in a docker container too. The specified image is Alpine Linux v3.9.x;environment- here we specify Environment name in which we deploy our site. Environment name might be any you like, but it should reflect the aim of Environment, for example:development,staging,production,live;variables:- here we describe a list of variables, that will be used in our deploy script;script:- here comes a list of commands, which will be run during Job execution:apk --update add openssh-client- install ssh client to have ability connecting to the remote host;eval $(ssh-agent -s)
echo "$MAW_HOST_SSH_PRIVATE_KEY" | tr -d '\r' | ssh-add - > /dev/null- run ssh agend as a deamon and add remote host private key to it;mkdir -p ~/.ssh && chmod 700 ~/.ssh
ssh-keyscan -t rsa -H $MAW_HOST >> ~/.ssh/known_hosts && chmod 644 ~/.ssh/known_hosts- use ssh-keyscan to gather public keys of the remote host and place it toknown_hostsfilescp dist.zip $MAW_HOST_USER@$MAW_HOST:/tmp/- usescpto move zipped build to the remote host;ssh "$MAW_HOST_USER@$MAW_HOST" 'bash -s' < misc/deploy/deploy.sh $MAW_HOST_VHOST_SITE_ROOT- execute deploy script on remote host to unzip, backup and update website.
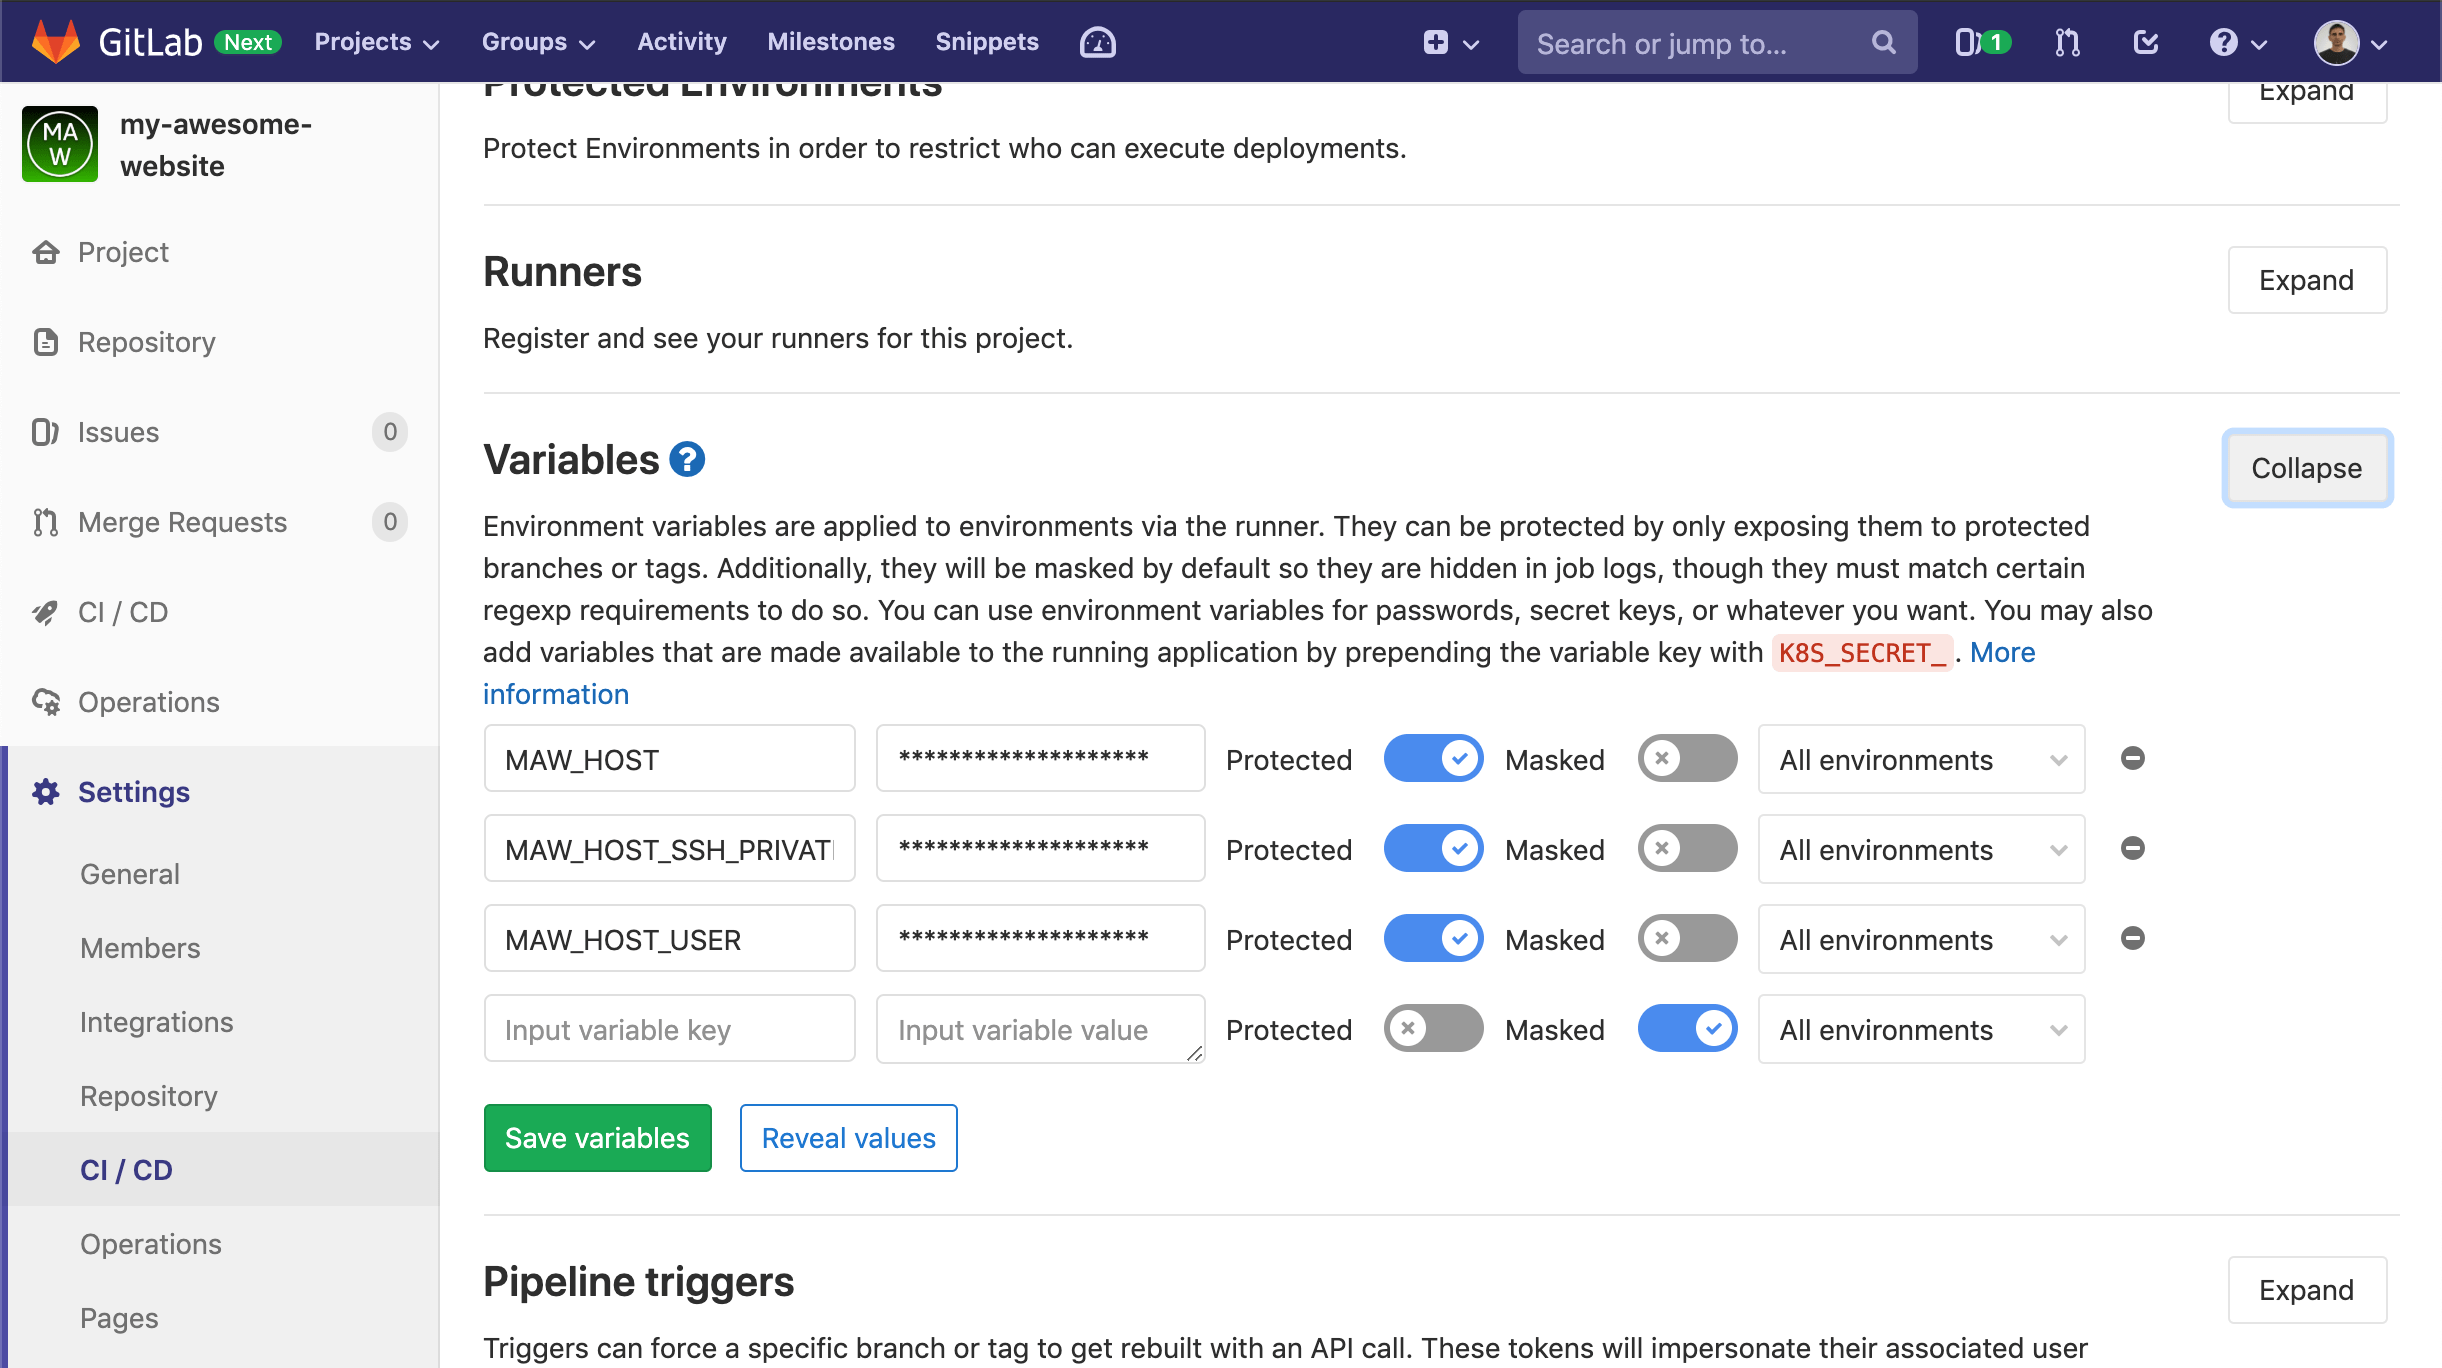
MAW_HOST, MAW_HOST_USER and MAW_HOST_SSH_PRIVATE_KEY are GitLab Variables. You need to set them up under Nav menu>Settings>CI/CD before the first Pipeline run because they use during Job execution:
Commit .gitlab-ci.yml file in repository and push changes.
Go to the project's Pipelines list (Nav nenu->CI>CD->Pipelines). You will see that the first Pipeline of this project has started. Pipeline consists of two Jobs, described previously in .gitlab-ci.yml: Build and Deploy respectively. Each Job contains a job execution log and brief information such as execution time, used runner and other.
As soon as all Jobs of Pipeline finish successfully - Pipeline is considered successfully finished. Unsuccessful Pipeline, or its specific Job, can be repeated. This is useful in cases where Job has fallen due to a problem with external factors, like when dependencies of the project could not be downloaded or the remote host might temporarily not available.
See below a few screens from our demo project.
The list of Pipelines:
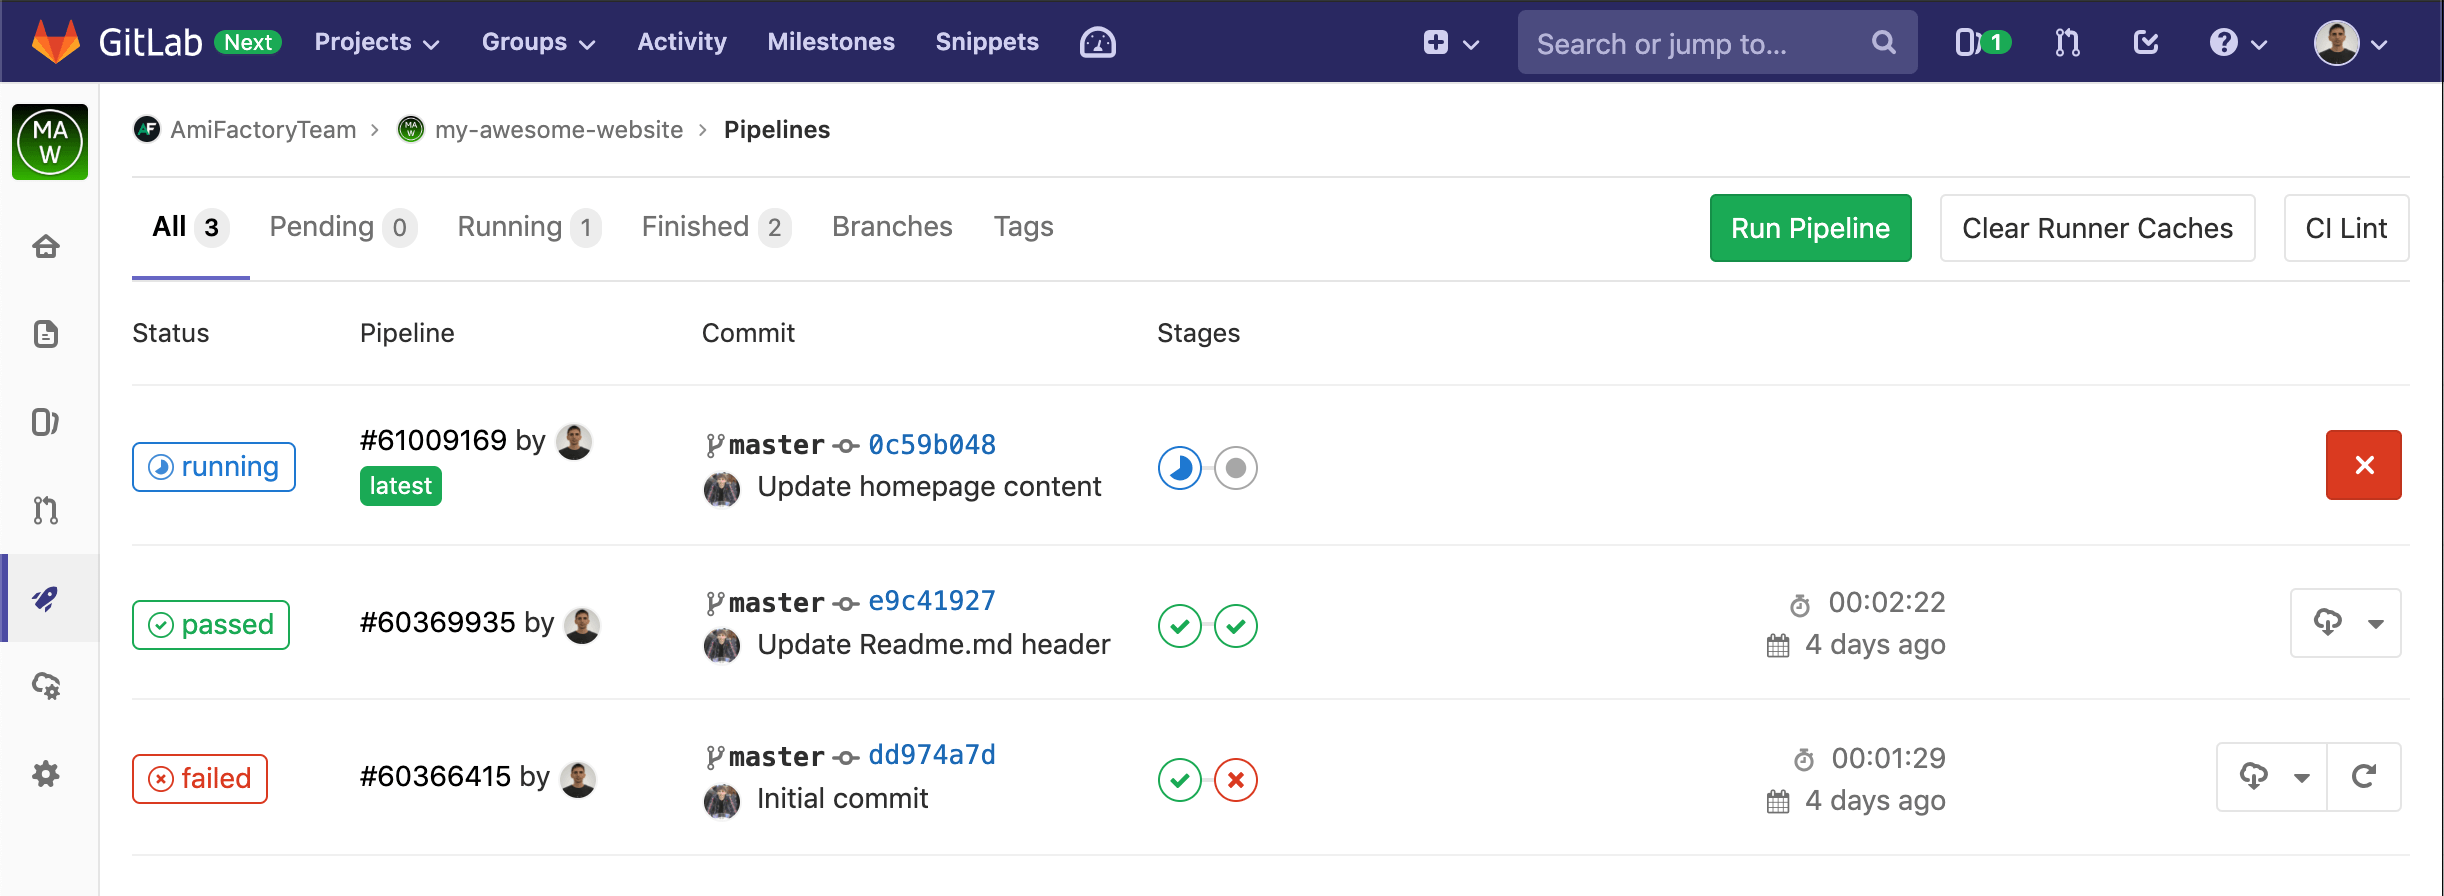
We see that the project has one failed, one passed and one running Pipeline. Also, you can notice, that the first Pipiline has failed on the second Stage - deploy_job and the third is currently running the first Stage - build_job. You can click on pipeline state label to open Pipiline details:
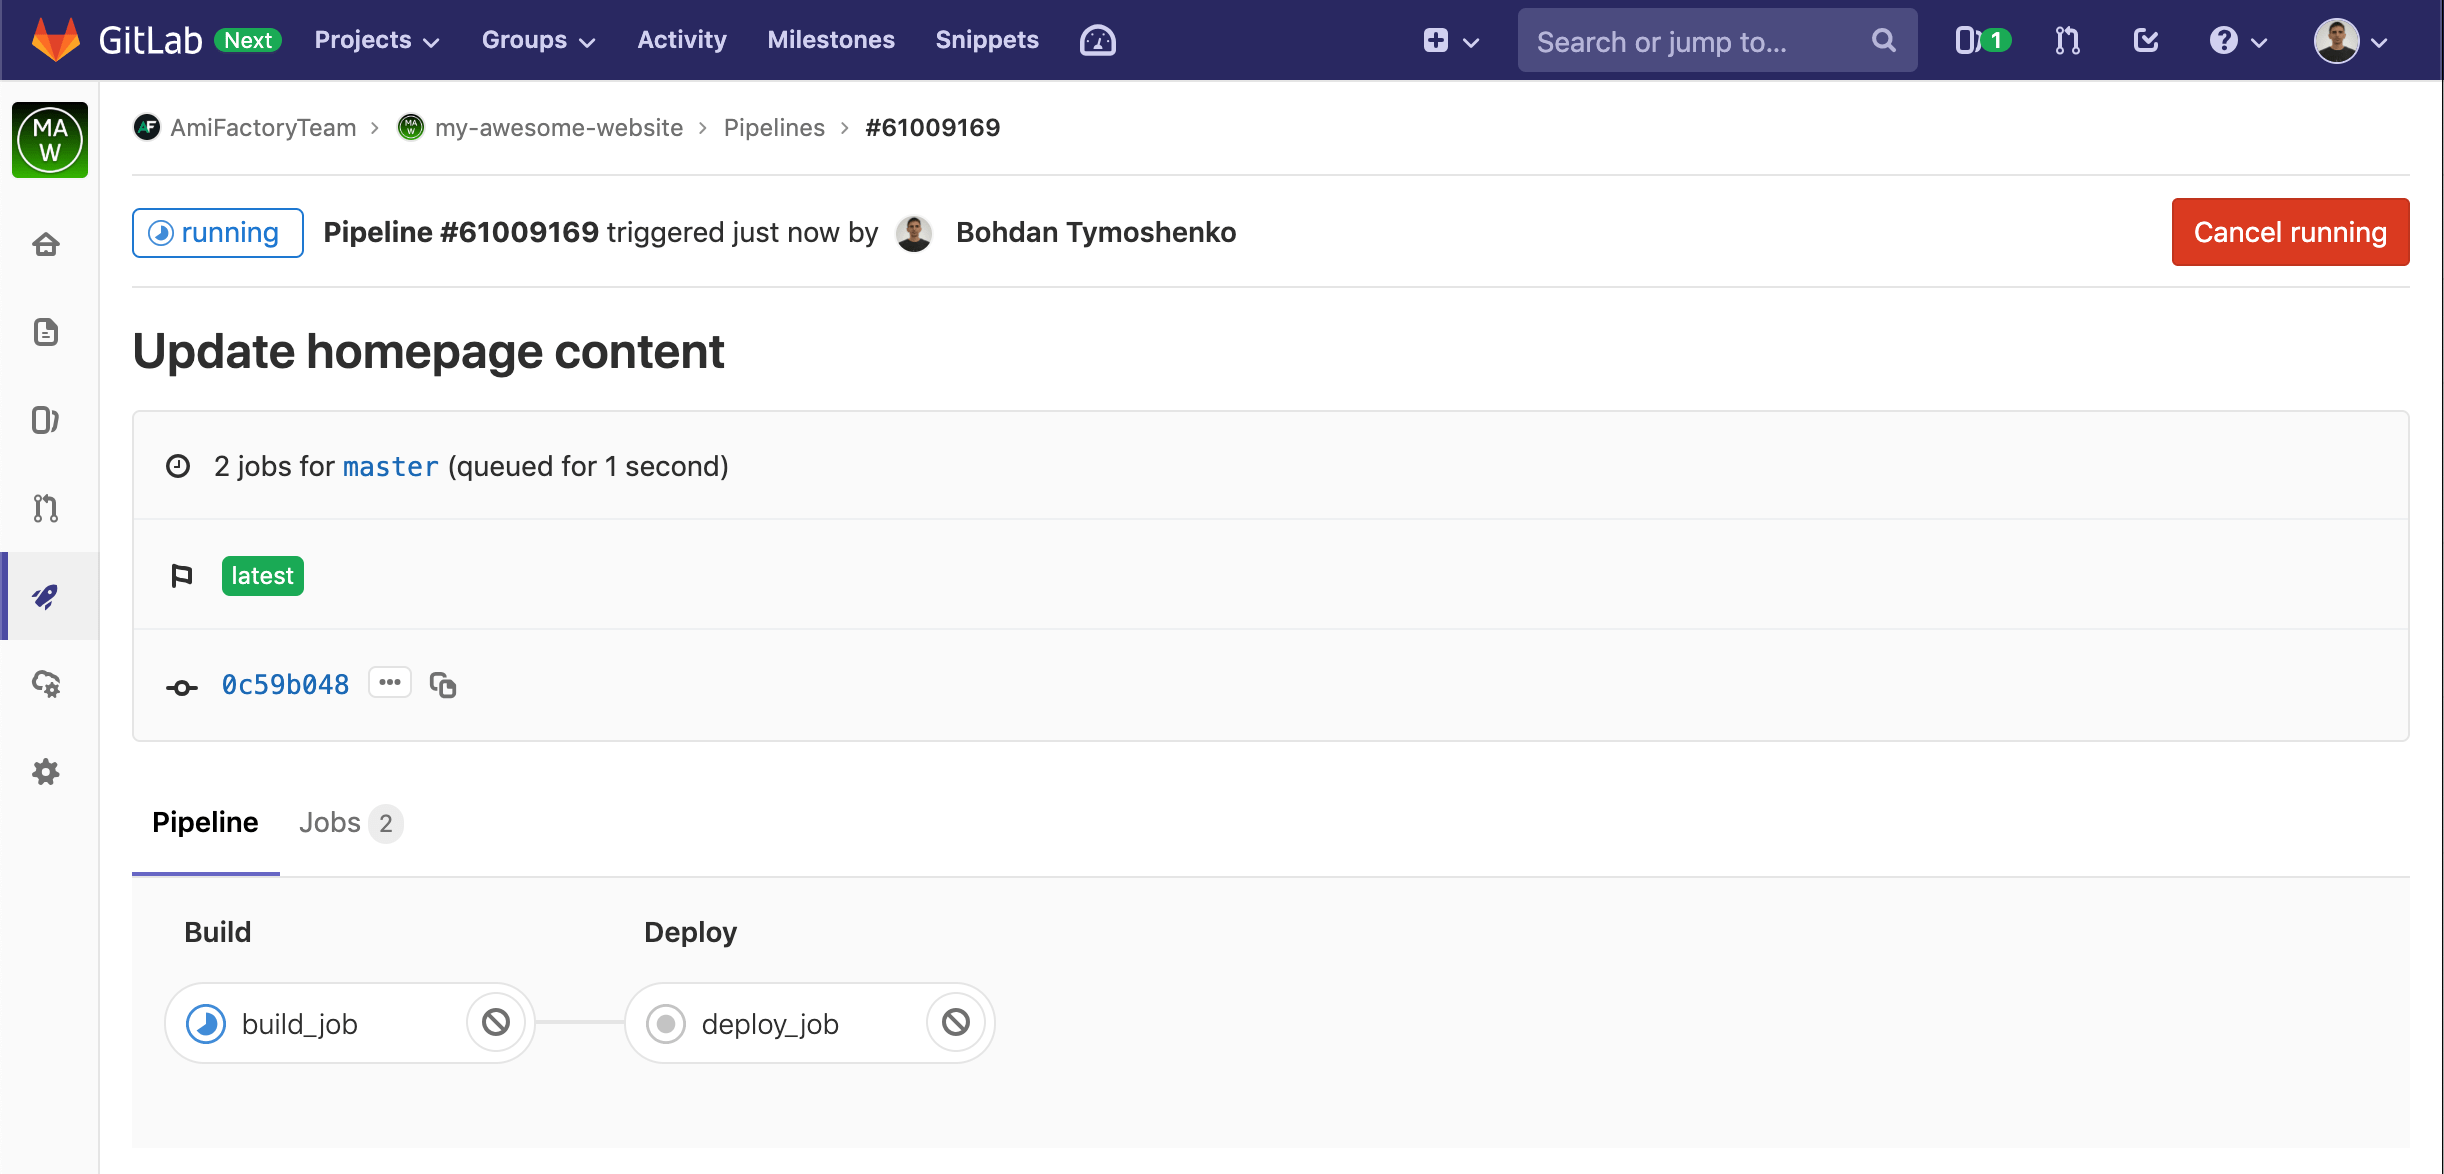
Here you can click on each Stage to see it details and run log:
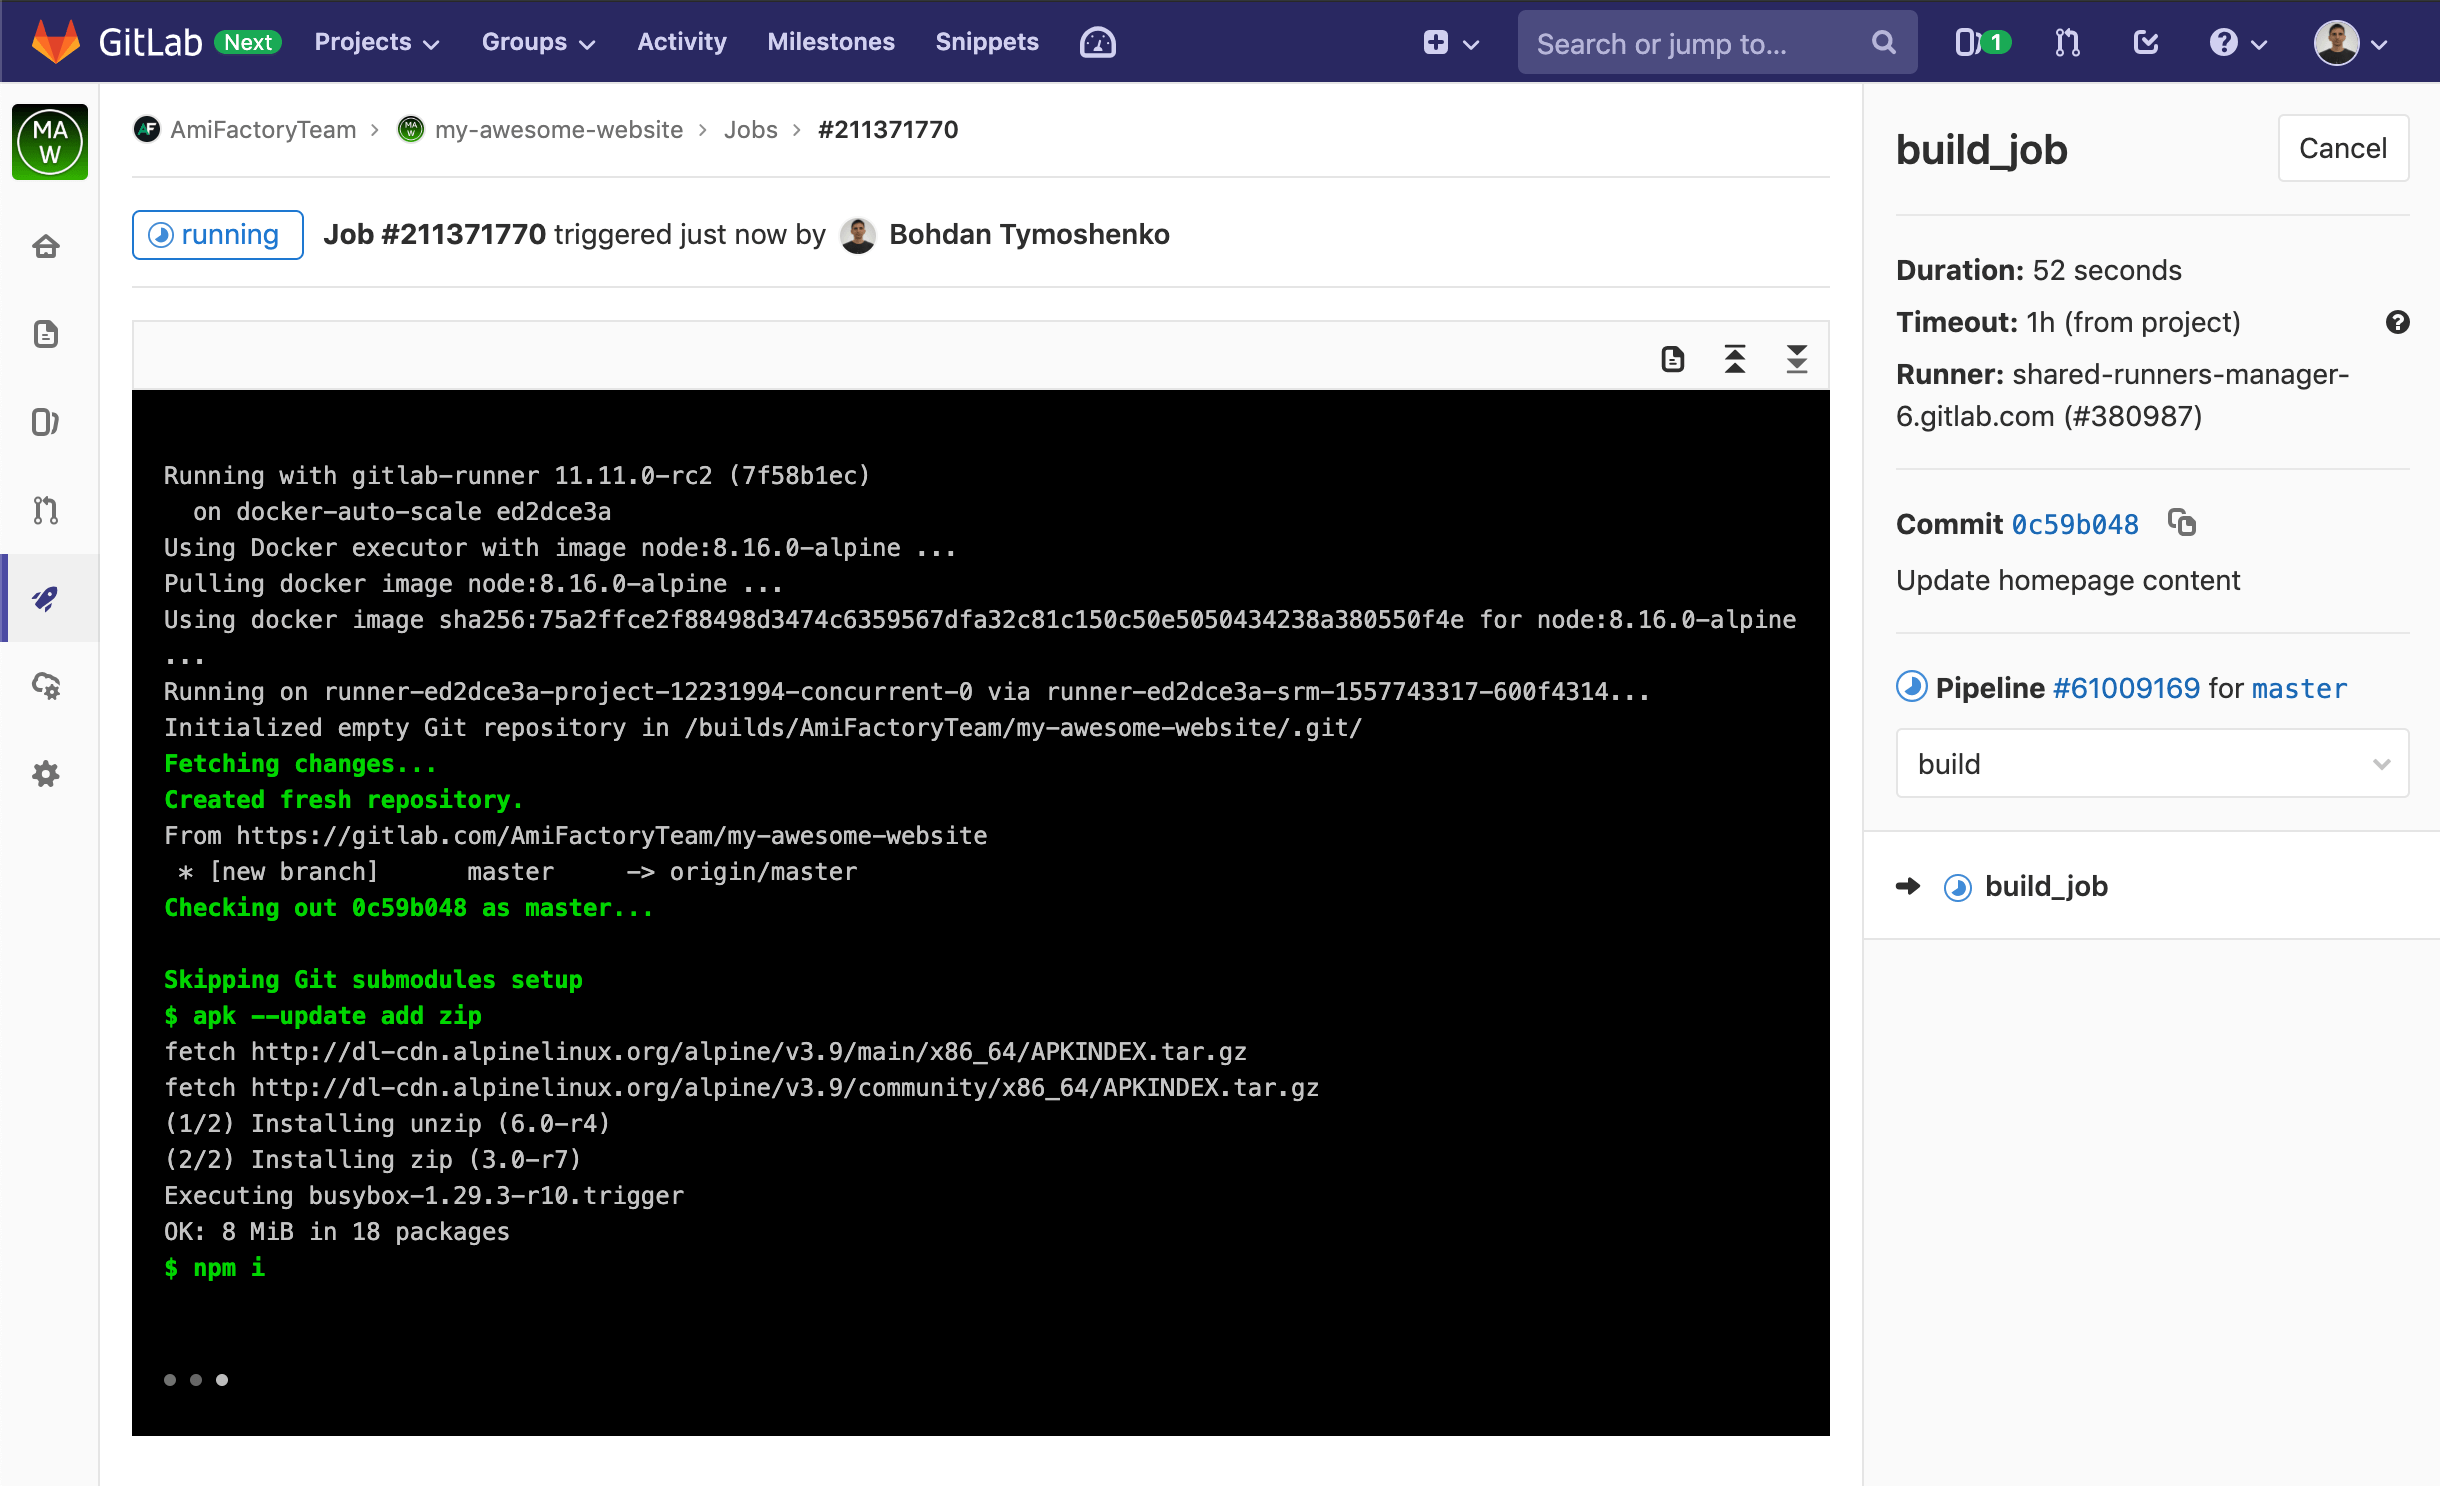
This is how GitLab helps visualize and provide information about CI/CD process.
Let's say a few words GitLab Environments. Environment is the abstraction for a project running environments, like staging or production. Environment saves information about the last successful deployment and the history of all previously deployments with the ability to quickly rollback to any past deployment. Here the list of Environments for our demo project:
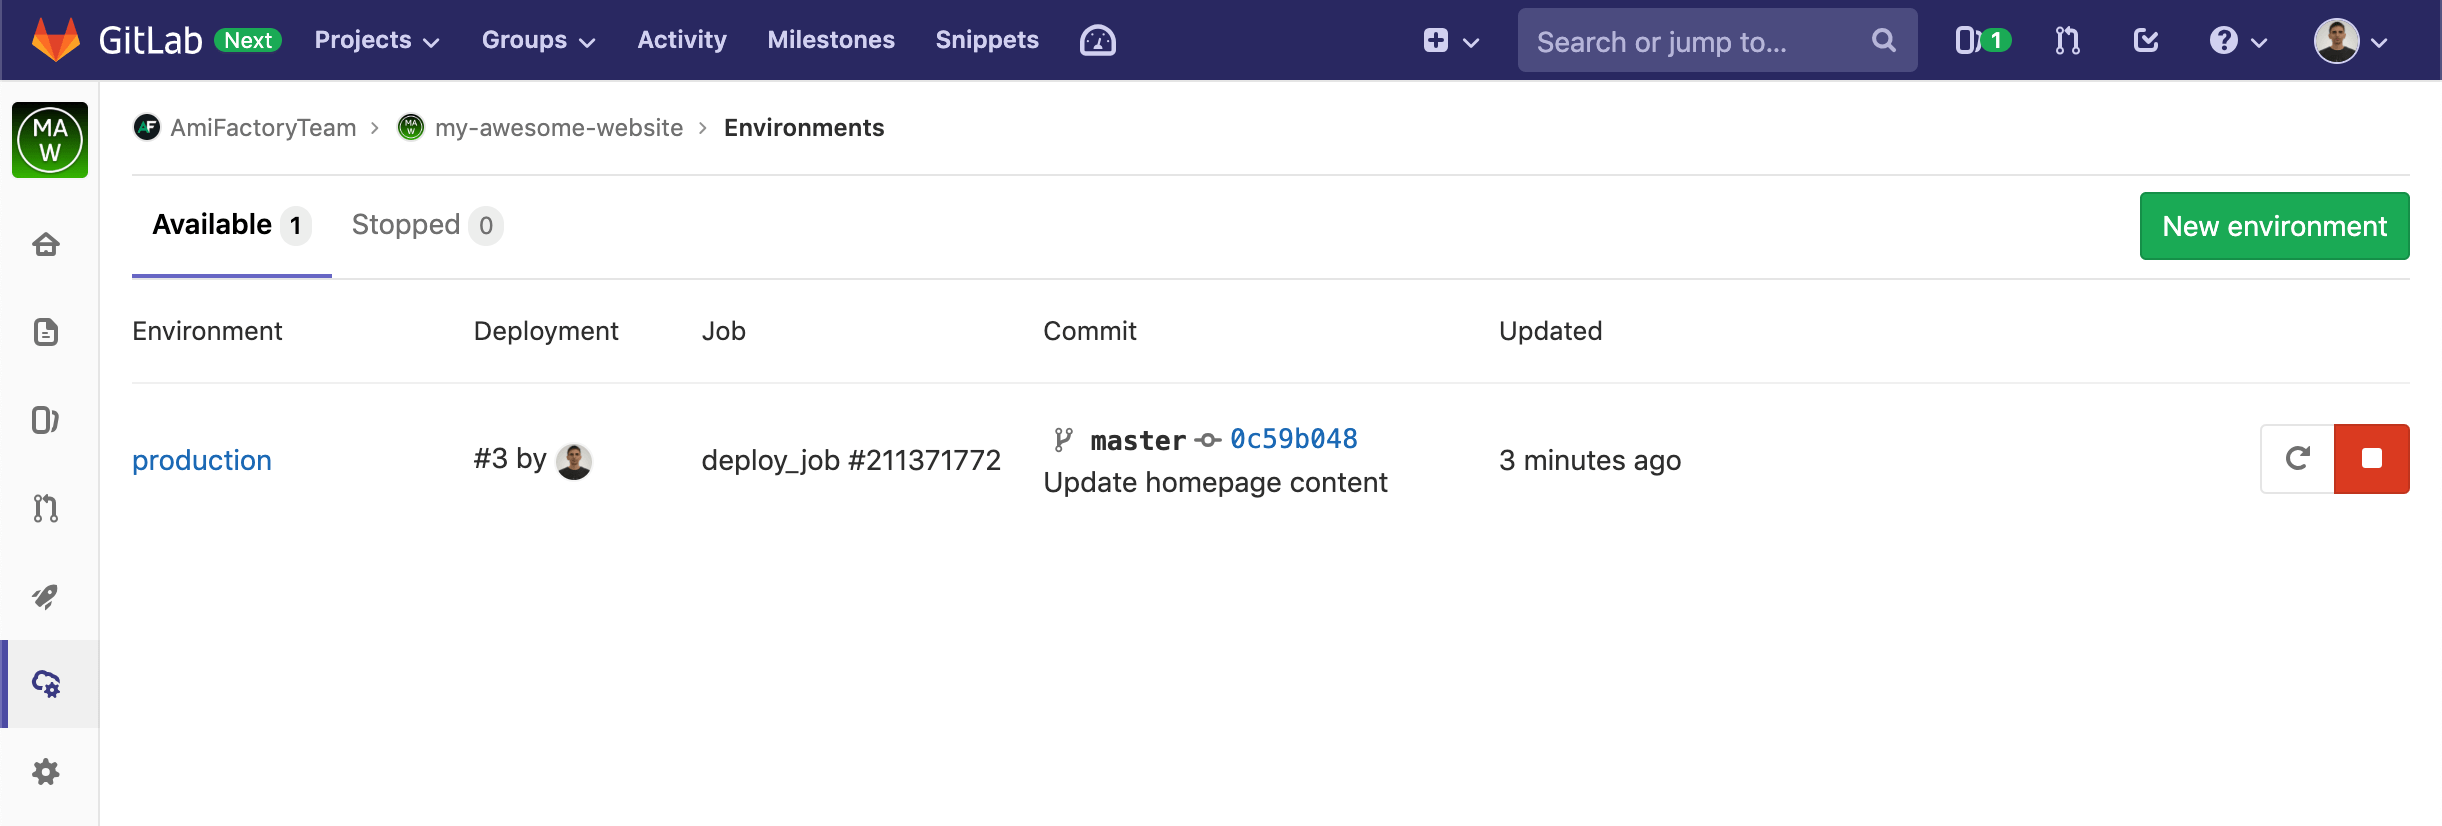
As you can see, we have the only one Environment production, described in .gitlab-ci.yml file. Clicking on the Environment name, we see the history of project deployments:
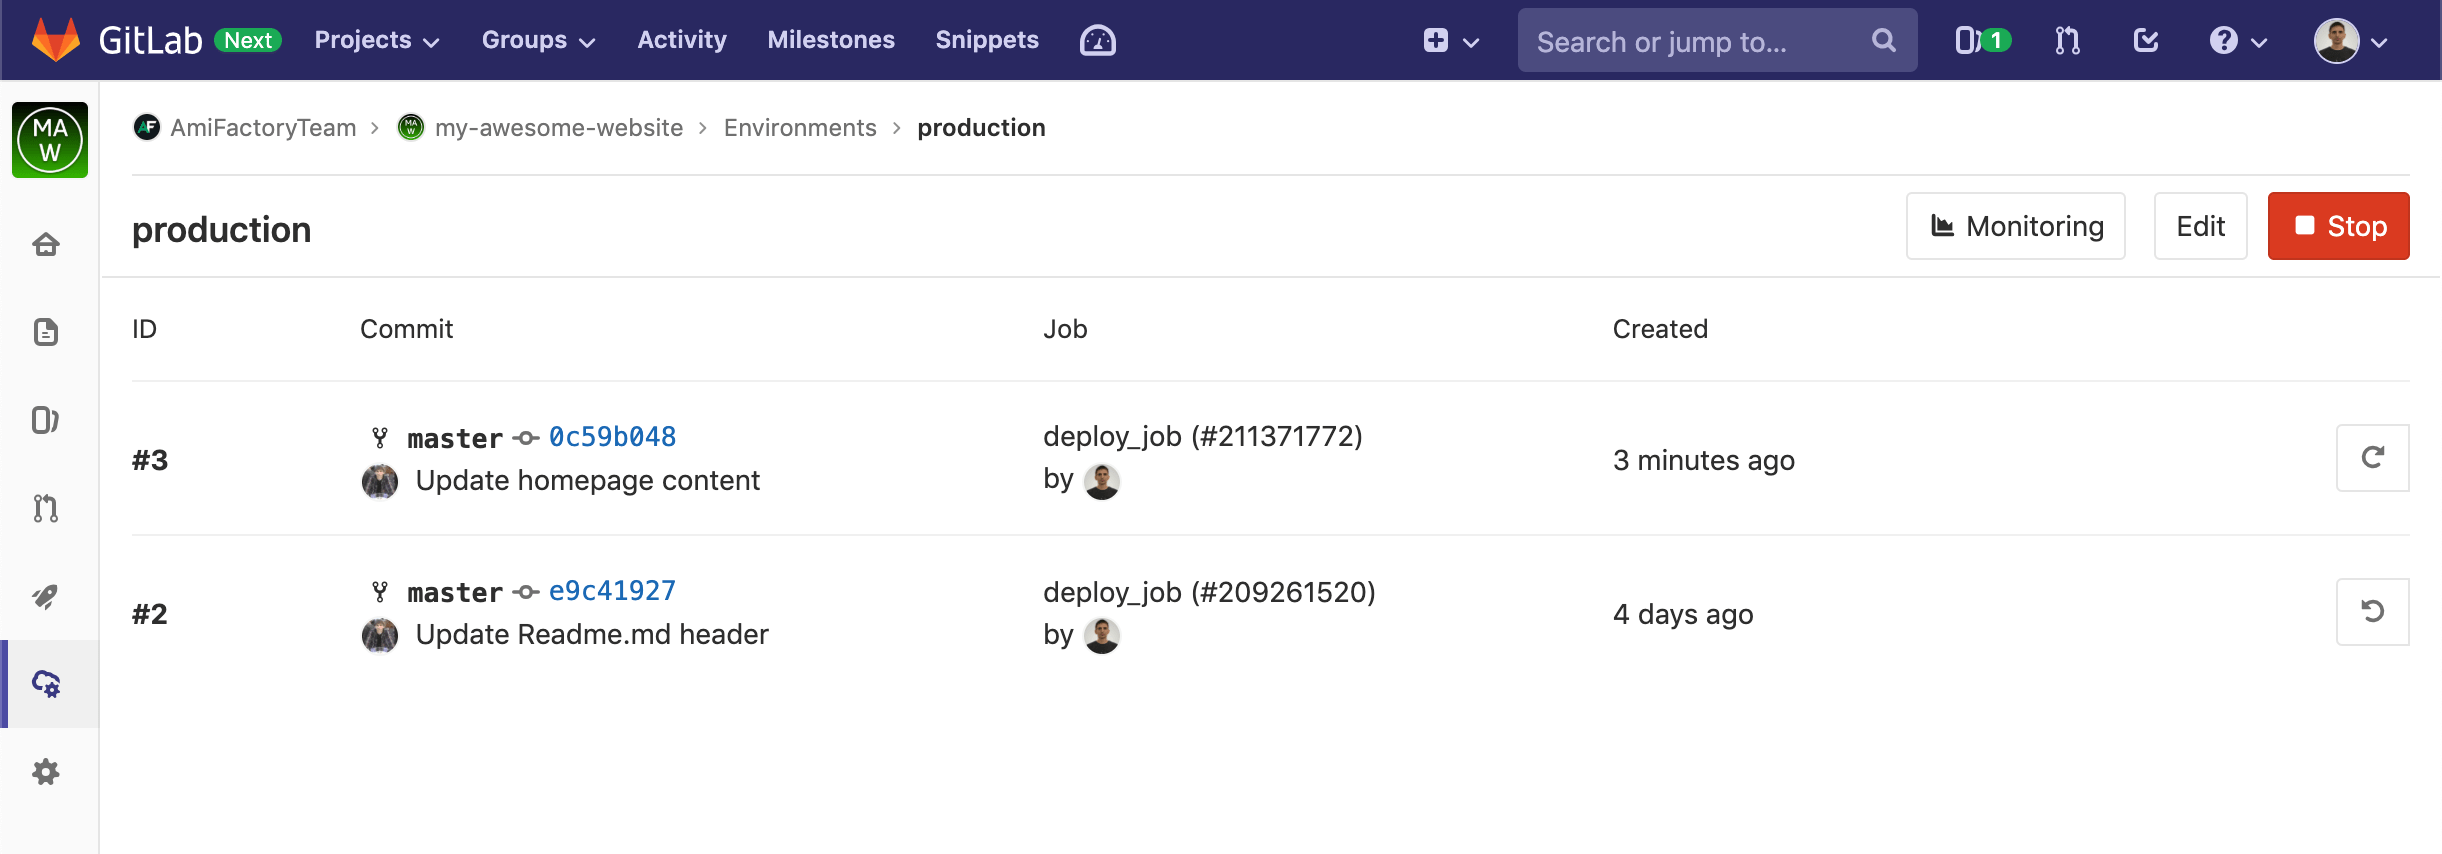
Buttons on the right run re-deployment for the deployment #3 and rollback to previous Environment state for deployment #2.
Pros:
- Full automation of building and deploy processes;
- Flexible and declarative way of describing each stage of the process in the
.gitlab-ci.ymlfile; - Flexible way to set up process triggers. Pipeline launch can be triggered by a commit on a defined branch, merge request, etc.;
- Deploy can be launched automatically after a successful build, or manually, thought 'Run' button;
- Ability to quickly rollback unsuccessful deployments;
- History and logs of builds and deployments;
- The CI/CD script code is located in the git repository;
- The developer may not have direct access to the remote host;
Cons:
- Changing CI/CD configuration requires changes to
.gitlab-ci.ymlfile with new commit to a repository; - Deploy jobs need to have access to the remote host. This requires saving the private ssh key in CI/CD secret variables. It's a typical approach for this kind of systems and not a big problem in the case of self-hosted installs.
Another minor disadvantage of the described method is the fact that GitLab is less popular than GitHub. GitHub is the de-facto standard both for opensource projects and product and service companies. Therefore, to use the described method, especially for exists projects, you will need migration or mirroring from GitHub to GitLab repository. Both options are poorly fit for existing projects, so this method is well suited for new projects, rather than for existing ones.
Summary
Let's summarize. The deploy of the modern website can be divided into several phases. There are at least two main stages: preparation steps execution, or build and the actual deployment to the remote server. In the simplest case, the first stage is executed manually and then with the help of scp, rsync or FTP, the files are transferred to the remote host. In case the project uses Git, it is possible to implement the deployment using git-hooks. For more complex projects, where the number of developers >1 is a good option is to use CI/CD techniques and tools like GitLab CI/CD pipelines. Always use the right tool for each task and happy deployment!
P.S. If I have interested you in using GitLab and features like CI/CD Pipelines and Environments or you want to know more on how we build GitLab-based automation at AmiFactory - let me know in comments! We are always glad to hear your feedback.